Created by Kamila Klavíková
Review of best practices for developing progressive web apps.
https://www.netguru.com/blog/pwa-ios
When on iOS and not PWA.
https://medium.com/walmartglobaltech/service-worker-lifecycle-20333ccd570a
At least for the moment. We will probably change this in the future.
Workbox is a set of libraries that can power a production-ready service worker for your Progressive Web App.
https://developers.google.com/web/tools/workbox/
The following data are given:
Thanks to the Web App Manifest, users can install your Progressive Web App to their device's home screen or programs list. Often, applications offer secondary entry points to directly access core functionality from the home screen, taskbar, or dock. Windows has Jump Lists for this purpose, macOS offers Dock Menus, KDE and Gnome provide Application Actions. On iOS, there are Home Screen Quick Actions, while Android provides App Sho
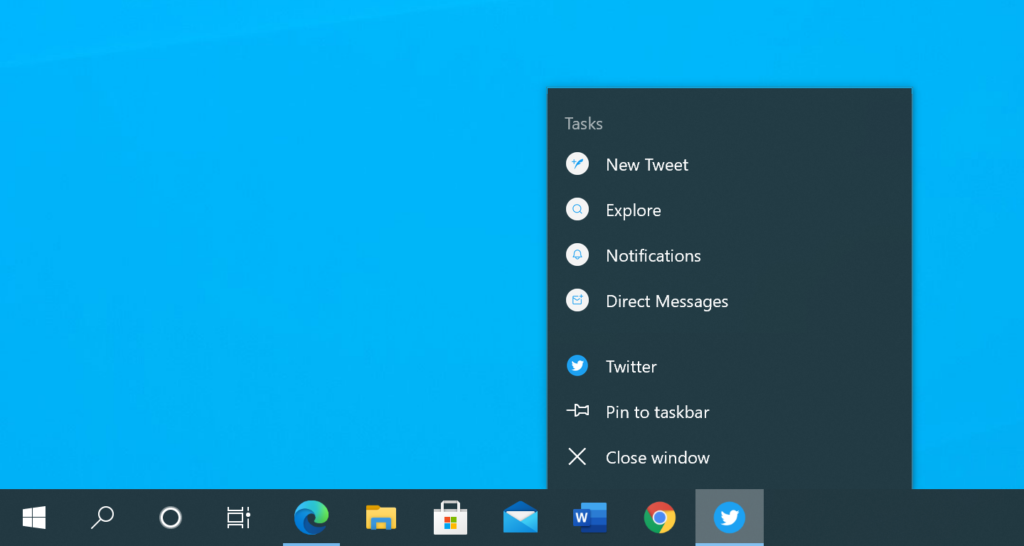
The Twitter PWA uses shortcuts to access other core tasks directly from the task bar
Shortcuts are a recent extension of the Web App Manifest, allowing you to define secondary entry points. All you have to do is add the new shortcuts member to your manifest:
{"name": "Twitter","shortcuts": [{"name": "New Tweet","url": "/compose/tweet","icons": […]}]}Shortcuts can have a name, short_name and description, point to a certain url, and specify icons, which follow the definition of other icon resources in the manifest. When the user activates a shortcut, your PWA’s window will be opened, loading the given URL.
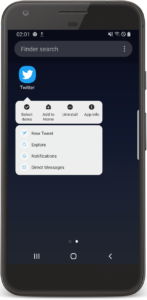
Write once, run anywhere: Shortcuts are also supported on Android
Shortcuts are currently supported by Edge on Windows (starting from version 85) and Chrome on Android (starting from version 84). In a potential second level of the Web App Manifest, dynamic access to shortcuts could be added. Shortcuts can currently only be a flat list; categories or groups are not supported yet.
Shortcuts are really easy to implement, so go out and make your users happy by allowing them to access your PWA’s core tasks even faster.
rtcuts.
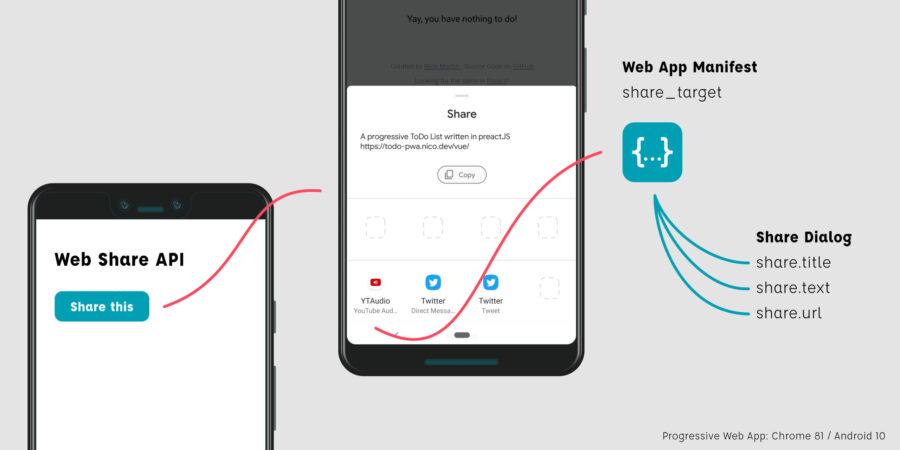
Day 2: 12/02/2020I think it's fair to say that sharing is one of the most time-saving interactions on our phones. So I am super happy to introduce two APIs that allow us to share content across web- and native applications.
if (navigator.share) { navigator.share({ title: 'PWAdvent', text: 'Check out PWAdvent.dev, the perfect advent calendar for everyone who\'s excited about the web platform', url: 'https://pwadvent.dev/',}).then(() => console.log('Successful share')).catch((error) => console.log('Error sharing', error));}share_target. This entry accepts some params that somehow feel a lot like the HTML-form element. You basically define an action, which serves a target-endpoint, a method (GET, POST) and your data. Note that you are completely free to use the params you like. But it makes sense to stay compatible with the web share API: {"name": "MyApp","share_target": {"action": "share.html","params": {"title": "name","text": "description","url": "link"}}} This example will in the end just open an URL:https://myapp.com/share.html?name={webshare.title}&description={webshare.text}&link={webshare.url}In your application, you can now process those values either on the server, on the client or as well in the ServiceWorker.But of course, it does not stop there. The Share Target API is designed to be very similar to the HTML form. For example, it is also possible to send files via a POST request. https://blog.pwabuilder.com/posts/introducing-the-brand-new-pwa-builder/
https://love2dev.com/pwa/progressive-web-app-disadvantages/
Handle URLs within the scope of PWA.
![]() -Beginning-Progressive-Web-App-Development-Creating-a-Native-App-Experience-on-the-Web.pdf
-Beginning-Progressive-Web-App-Development-Creating-a-Native-App-Experience-on-the-Web.pdf
https://web.dev/what-are-pwas/
https://www.creativebloq.com/how-to/build-a-progressive-web-app
The Indexed Database API or IndexedDB is meant to store and query large amounts of data in all major modern browsers.
It comes with a versioning system included. When creating a Database, it must have a version info (integer number, floats and other numbers will be rounded), it will be version: 1 if none is provided.
Providing a version greater than the current one starts the upgrade process. A verisonchange transaction is started and the upgradeneeded event is fired. The event handler of the upgradeneeded event is the only place where data and database migration is possible.
The Indexed DB API provides a way to manage JSON objects in a NoSQL database. Further, it is possible to define keys and indices on the stored data to optimize and improve queries to that.
Writes to the Database are transactional and auto-committing. It is a good practice to keep the transactions atomic and short-lived, as the browser could kill long-living transactions to free allocated memory for other purposes at any time.
IndexedDB makes it very convenient to implement an offline storage. The access and manipulation of data doesn’t require a network connection at all. However, the developer needs to take care of synchronizing the data between a remote service and the local IndexedDB.
Moreover, it is possible to store large amounts of data and binary large objects (BLOBs).
In contrast to the Session Storage or Local Storage, the Indexed DB is not limited to a few MB in size; it can exceed multiple hundred MB. There is no hard cap on its size; the limit is determined by the browser and can be managed by the Storage Manager API.
The Indexed DB API is a rather low-level access layer, there are a couple of libraries that provide a more convenient higher-level access to this functionality. Prominent and commonly used libraries of that kind are Dexie.js and localForage. You can find a full list here.
PWAdvent uses idb, a small, promise-based indexedDB wrapper by Jake Archibald.
https://github.com/nico-martin/PWAdvent/blob/main/src/store/idb.ts
As a small example, we use indexedDB with idb and TypeScript to store the articles.
import { openDB, DBSchema } from 'idb';const dbName = 'pwadvent';interface PWAdventDB extends DBSchema { days: { key: string; value: any;};}const dbPromise = openDB(dbName, 1, {upgrade(db, oldVersion) {if (oldVersion < 1) { db.createObjectStore('days');}},});export const daysDB = {get: async (key: string) => (await dbPromise).get('days', key),set: async (key: string, val: any) => (await dbPromise).put('days', val, key),delete: async (key: string) => (await dbPromise).delete('days', key),};Now, wherever we need it we can call our daysDB object like this:
import { daysDB } from 'path/to/idb.ts';// get an article daysDB.get('6').then(day => console.log(day));// save an article daysDB .set('6', { title: 'Article 6', content: 'This is an article',}).then(() => console.log('done'));https://developer.mozilla.org/en-US/docs/Web/API/IndexedDB_API
https://developer.mozilla.org/en-US/docs/Web/API/IndexedDB_API/Using_IndexedDB
https://developers.google.com/web/ilt/pwa/working-with-indexeddb
https://www.w3.org/TR/IndexedDB-2/
https://w3c.github.io/IndexedDB/
When a user visits a PWA with a service worker and manifest, Chrome will automatically prompt them to install it to their homescreen, given the following: the user must visit the site twice, with five minutes between visits.
The idea here is to wait until the user demonstrates interest in your application, and then ask them to make it a fixture of their device (this is in sharp contrast to the native app approach, which asks for that investment up-front).
But there may be cases where you want to show the install prompt in different situations, such as after the user takes a particular useful action. To do so, we intercept the beforeinstallprompt event and save it for later, then deploy the prompt when we see fit.
window.addEventListener('beforeinstallprompt', e => { console.log('beforeinstallprompt Event fired'); e.preventDefault();// Stash the event so it can be triggered later.this.deferredPrompt = e;return false;});// When you want to trigger prompt:this.deferredPrompt.prompt();this.deferredPrompt.userChoice.then(choice => { console.log(choice);});this.deferredPrompt = null;In order to make your application installable, you need to include a manifest.json in the application's root directory. You can think of this as a description of your application, similar to what you might submit to the App Store. It includes icons, a splash screen, a name and a description.
There's also some configuration for how your application appears when it is launched from the user's home screen: Do you want to show the address bar in the browser or not? What colour do you want the status bar to be? And so on. Note that a proper manifest.json should include a full spectrum of icon sizes for various devices. The code below is a preview of some of the properties your manifest can include.
{
  "short_name": "Chat",
  "name": "Chat",
  "icons": [
  {
    "src":"/assets/icon.png",
    "sizes": "192x192",
    "type": "image/png"
   }
  ],
  "start_url": "/?utm_source=homescreen",
  "background_color": "#e05a47",
  "theme_color": "#e05a47",
  "display": "standalone"
}
Manifest files are supported in Chrome, Edge, Firefox, UC Browser, Opera, and the Samsung browser. Safari has partial support.
Asi bych ho napsal v .edn a vygeneroval při startu serveru, nebo by se mohl nějak dát do nginxu, tedy předgenerovat ho staticky.
Online generátor: https://app-manifest.firebaseapp.com/
https://developer.mozilla.org/en-US/docs/Web/Manifest
https://dev.to/paco_ita/service-workers-and-caching-strategies-explained-step-3-m4f
Once registered, Service Workers can intercept network traffic. You can use them to keep your applications offline by storing the application’s source and asset files on the user’s device. Caches are a part of the Service Worker API, which allow precisely that.
Just as Web Storage or IndexedDB, caches are separated by origin (the combination of protocol, hostname, and port). For an origin, you can create as many named caches as you like, each of which stores HTTP(S) responses for a given HTTP(S) request. Both the Service Worker and the website share access to the same cache storage.
To access the cache, website, and Service Worker, use the caches object from their respective global scope. As discussed in yesterday’s door of PWAdvent, you should store all necessary source and asset files during the Service Worker’s install lifecycle event.
self.addEventListener('install', event => { event.waitUntil( caches.open('cache-v1').then(cache => cache.addAll(['','/index.html','app.js','main.css',])););});To use a cache, you need to open it first by calling the open() method and passing a cache name. If this particular cache did not exist before, it would automatically be created and opened. It makes sense to version your caches by adding a version suffix. The addAll() method allows you to specify HTTP requests that should be downloaded and stored in the opened cache. You can also call the add() method with a single HTTP request or the put() method if you already have an HTTP request and response.
In the Service Worker’s fetch event, you can intercept a website’s network request. Here, you can decide to return a response from your cache instead of sending it over the network. In the event arguments, you can access the request sent in from your application. Therefore, you could again open a particular cache and then call the match() method to match an HTTP request against the entries stored there.
self.addEventListener('fetch', event => { event.respondWith( caches.open('cache-v1').then(cache => cache.match(event.request)).then(response => response ?? fetch(event.request)););});If a matching entry was found, it would be returned. Otherwise, the method will return undefined. The sample from above will always return the cached value if present. Otherwise, it will fall back to the network by calling the fetch() method. This is also referred to as the Cache-first offline strategy. You can mix and match the approaches as you like to implement other offline strategies. Again, both the website and the Service Worker share access to the cache storage, so you can also add, put, or match responses during your PWA’s runtime, such as implementing dynamic caching.
Manually managing the cache storage via your Service Worker script can be a tedious task. The number of files and their names may change, so hard-coding them does not seem like a good idea. That’s where Workbox comes in. Workbox is a toolchain by Google that allows you to generate a Service Worker implementation, for example, based on your build output. To do so, simply:
npm i -g workbox-cli)workbox wizard to configure which files should be cachedworkbox generateSW to generate a Service Worker matching your configuration, every time your source files change (for example, as a part of your Continuous Integration pipeline)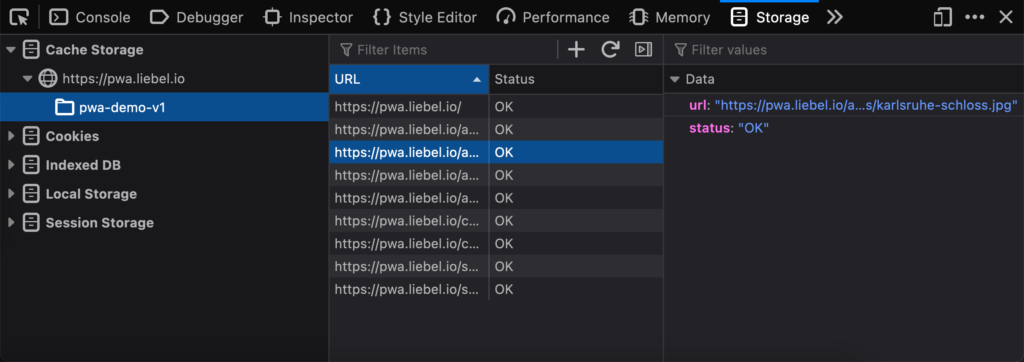
As a developer, you can inspect and debug your caches using the developer tools (F12) of your browser. In Chrome, you can find your website’s cache storages in the Application tab; Firefox shows them in the Web Storage tab. The maximum storage quota and persistence varies from platform to platform. In comparison, Chromium-based browsers tend to be very liberal, allowing you to store up to 60% of total disk space per origin, while Safari appears to allow up to 1 GB and clears unused caches after “a few weeks”.
As you have seen, Caches are an important piece of keeping your PWA offline. Tools such as Workbox make it even easier to implement the offline capability. Now, your users are ready to load your PWA even in a tunnel or on a plane.