31.05.2025 – Pavel Klavík, Kamila Klavíková
Do you want to easily share just a part of your document? OrgPad’s new locations feature makes it possible. It also helps you organize even the biggest documents. Locations work as links that show exactly the part of your OrgPage you want—open cells, a set camera view, and hidden details. In this article, you’ll learn how to create locations, share them, and discover what they let you do.
#sharing, #update, #locations, #OrgPad, #improvements
We introduced locations to solve a few persistent problems. First, sharing a specific cell or group of cells was always a challenge. Big OrgPages would just open with everything closed. You could share a presentation step but that was never easy or flexible. Once opened, people stayed in presentation mode, which wasn’t ideal. Locations let you easily share just a part of an OrgPage.
When creating documents, it’s also useful to decide exactly what people see when they open them. Maybe you just want a few cells to show up, and some of them to be opened right away. We actually did this for the OrgPad’s landing page, but that was all hardcoded. Now you can achieve this for any OrgPage with locations.
It's also useful to be able to create links within a large OrgPage that take you to another part of it. When you click on such a link, the camera moves to the new location. This helps you keep track of your position. You can do this easily by using locations. This helps to link large OrgPages more effectively.
Think of a location as one step in a presentation. You can find locations in the side menu. There, you will see a list of existing locations and can create new ones.
Each location has an optional name so we can tell them apart. It also has a unique identifier within the document. This consists of upper- and lower-case letters, numbers, dashes, and underscores. A newly created location has four random characters as an identifier, but it can be changed to make it more memorable.
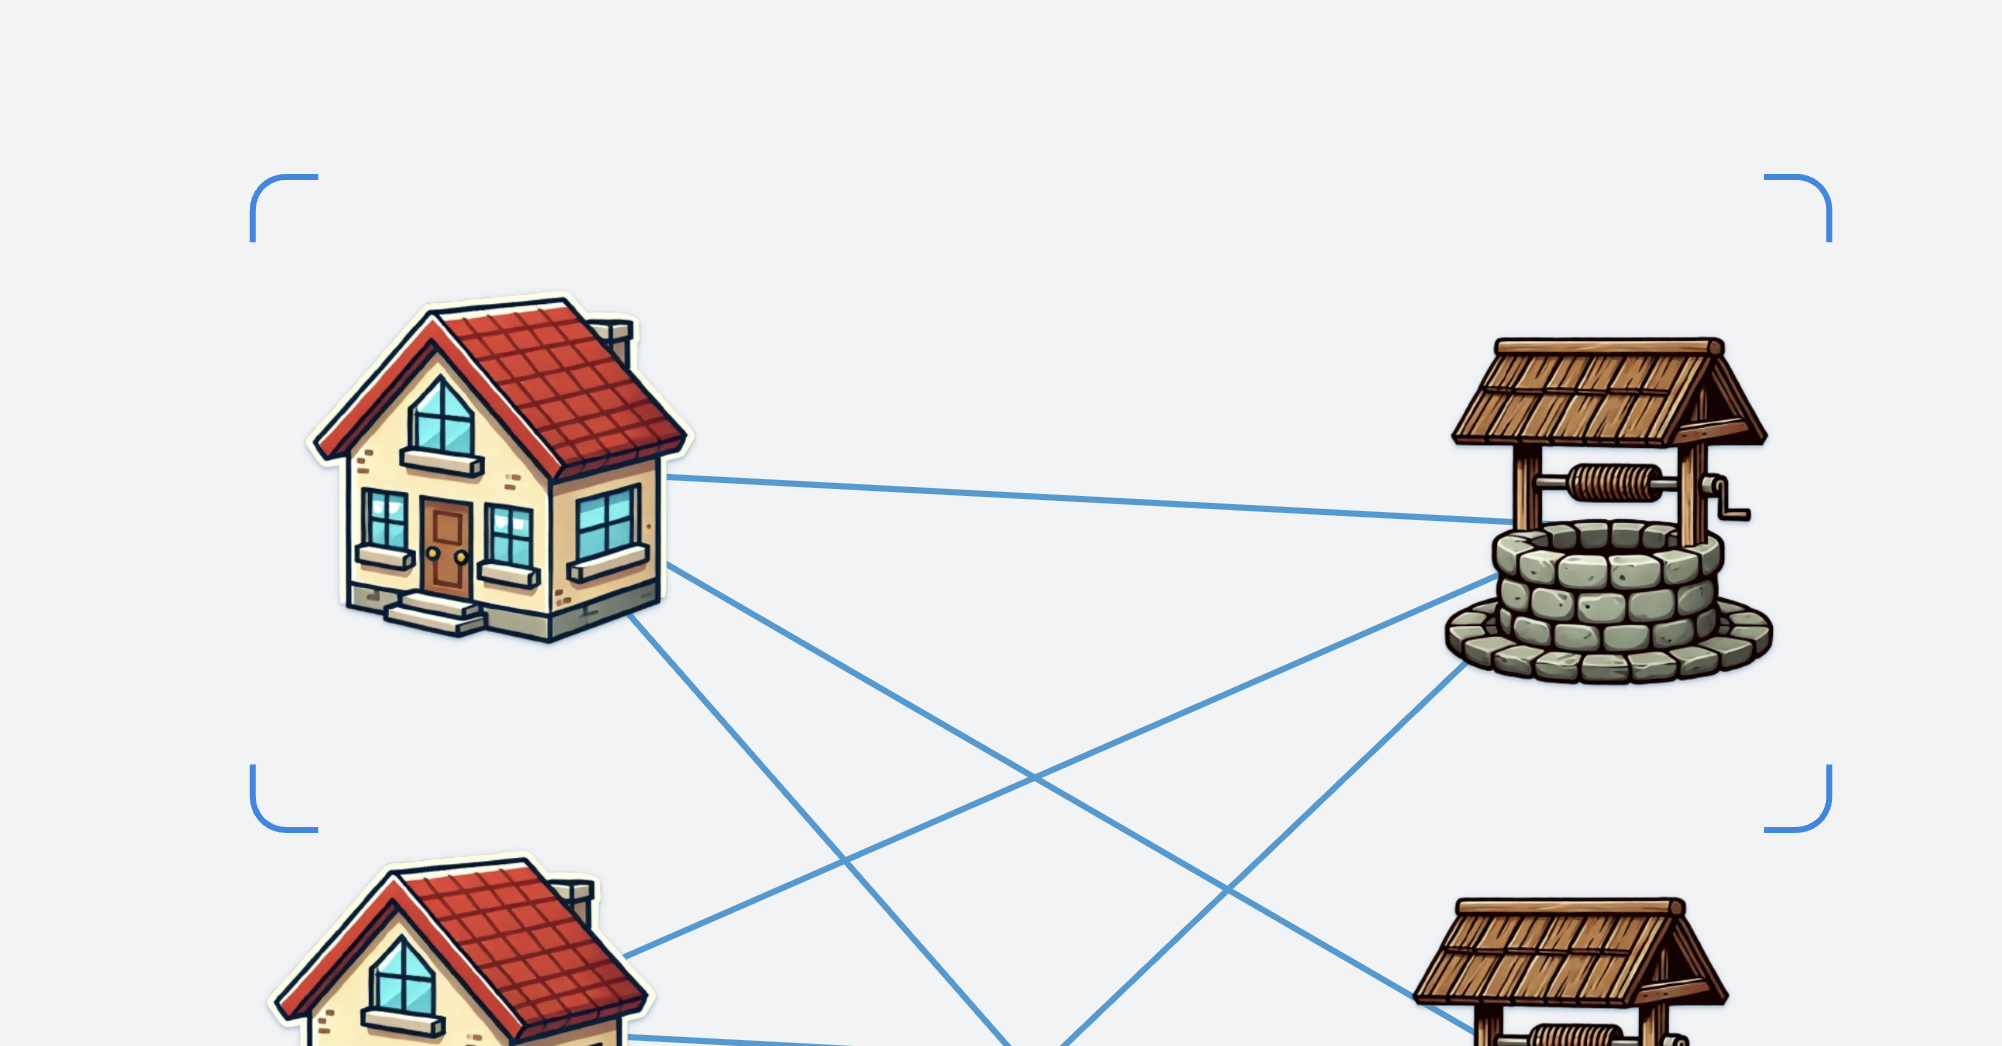
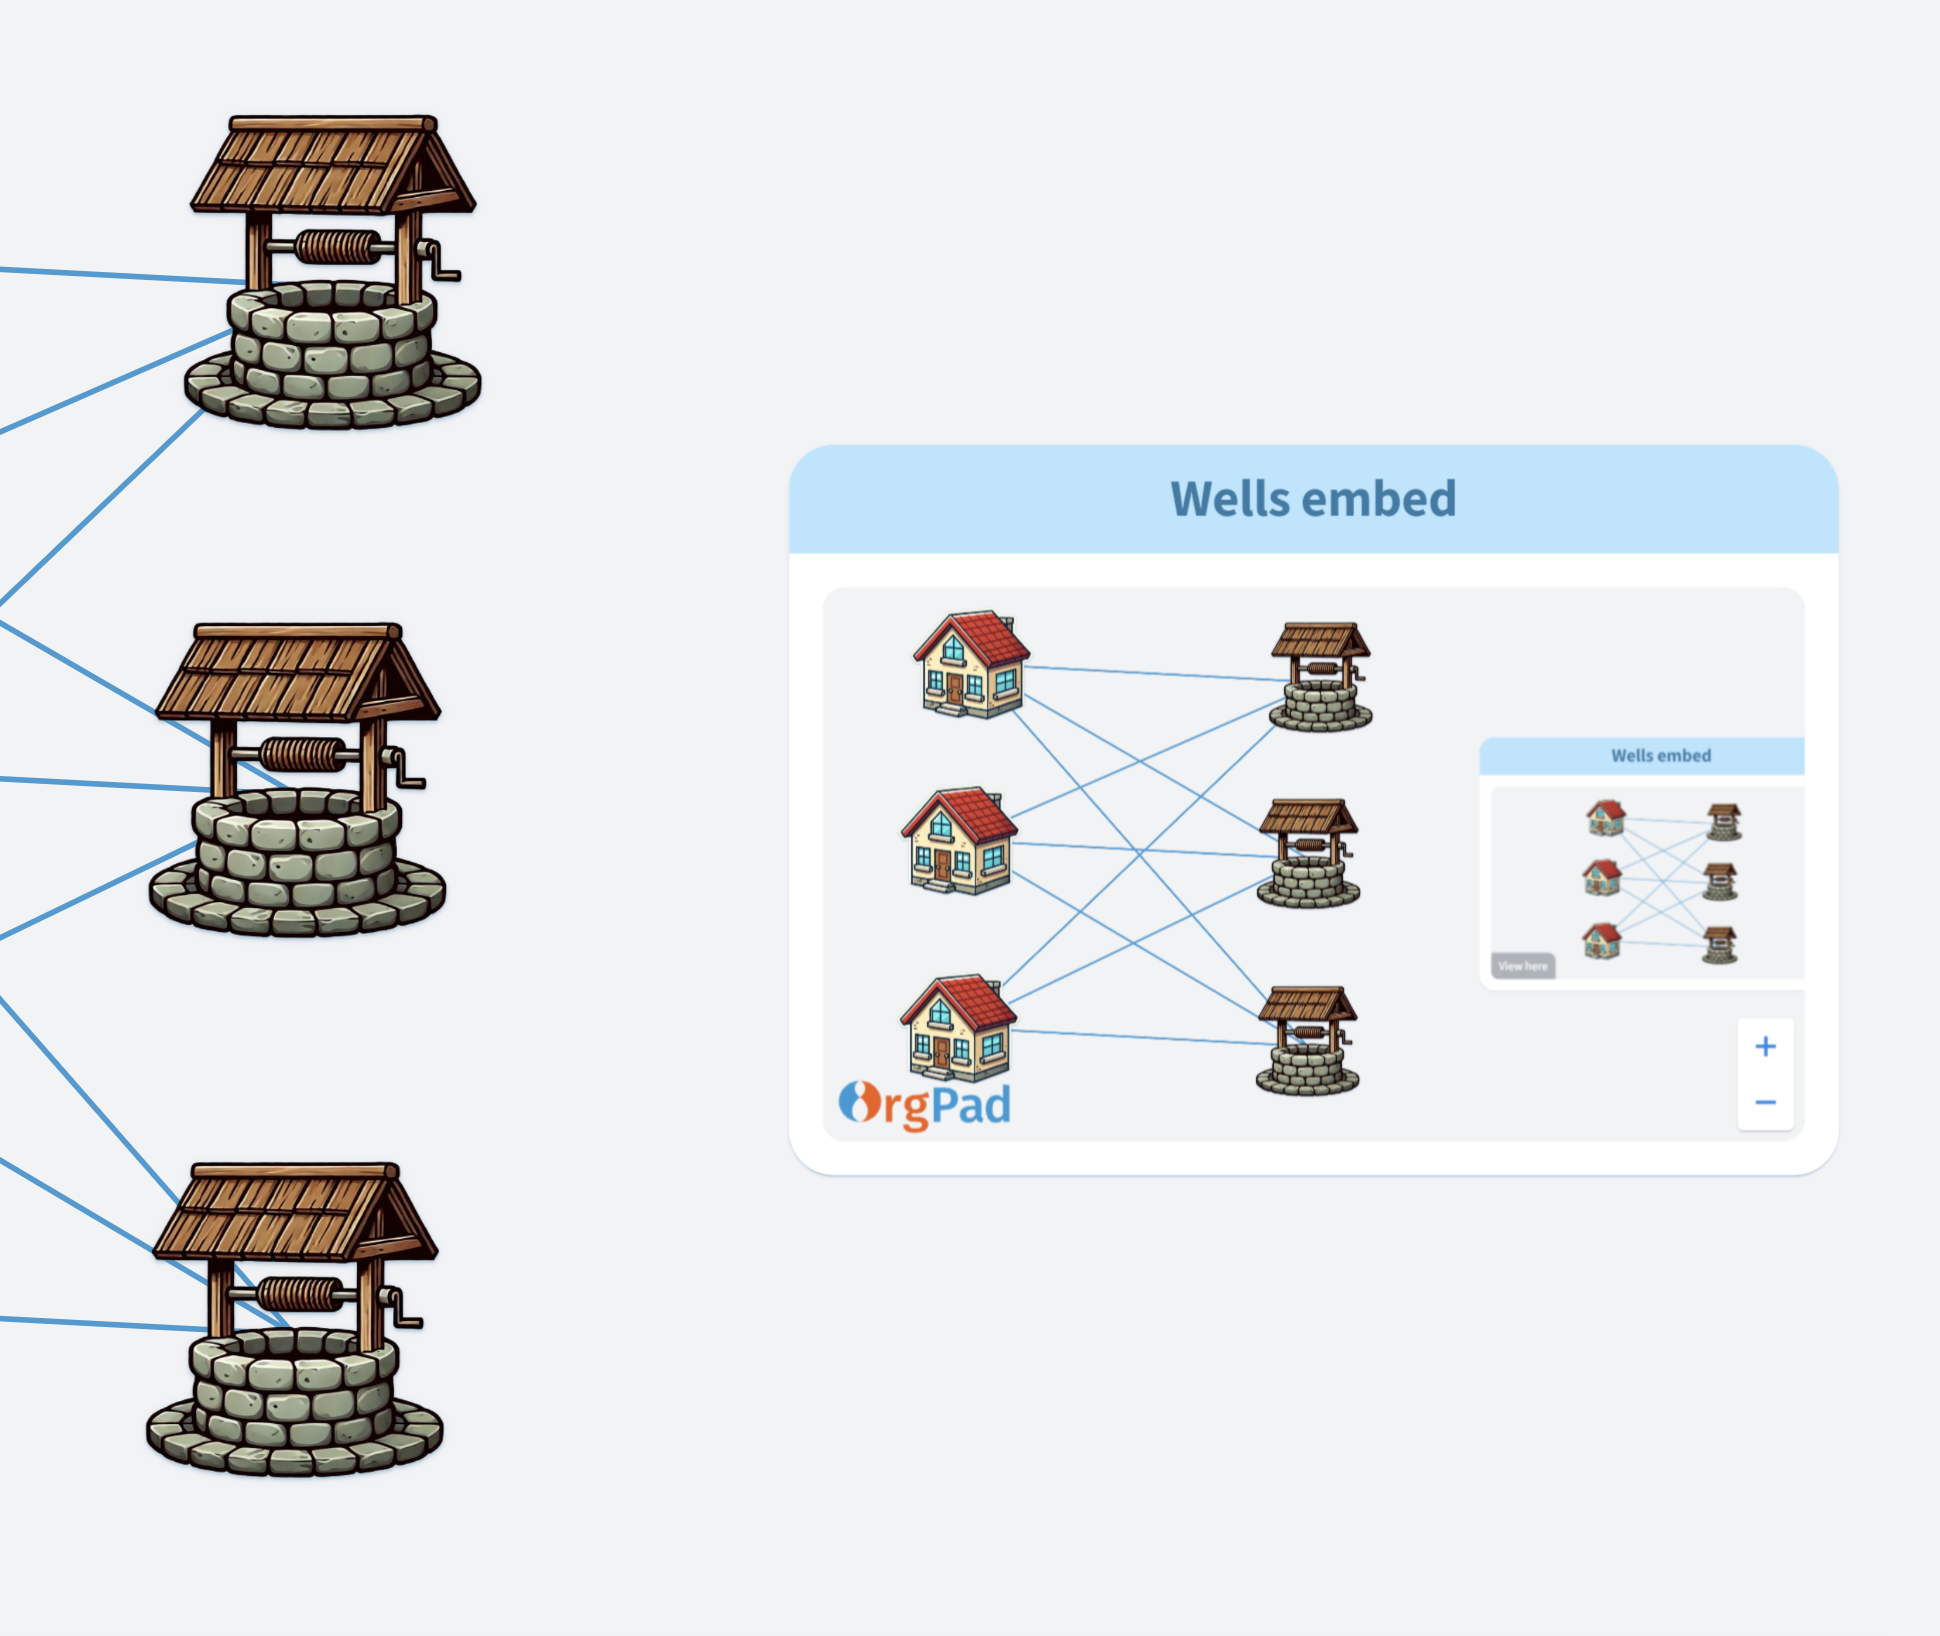
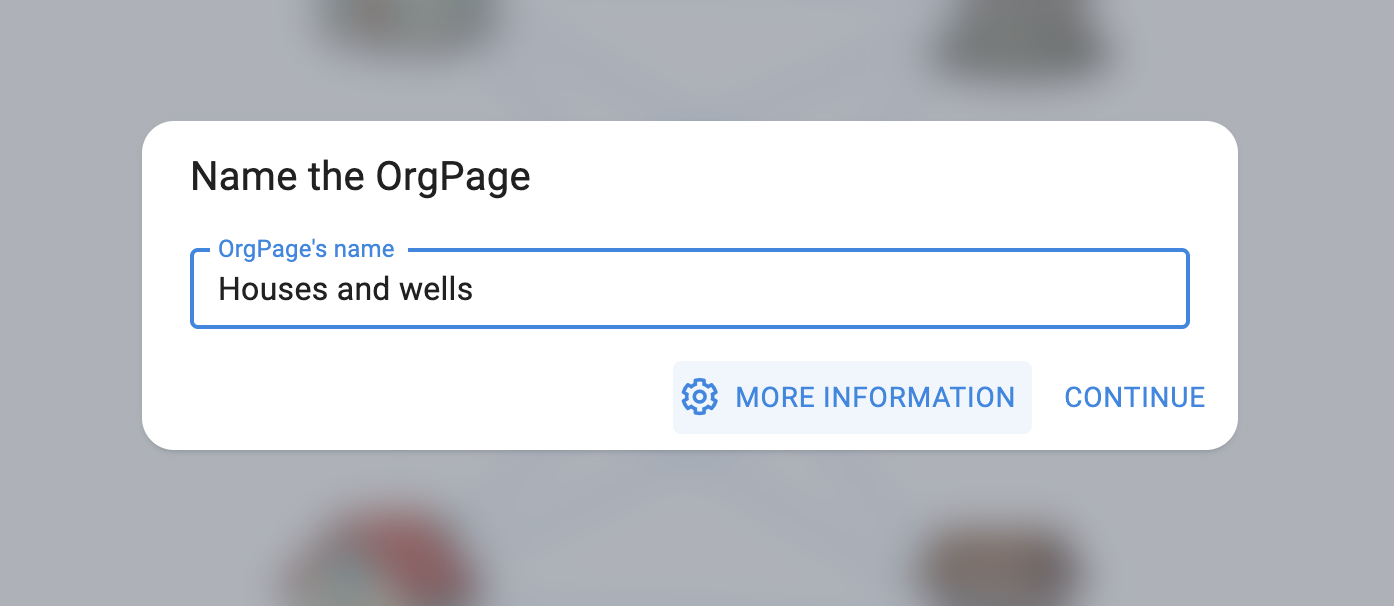
To open a location, just add its ID to the end of your OrgPage link, after a # symbol. For example, /s/houses-and-wells#houses centers the camera on houses, while /s/houses-and-wells#wells shows the wells.
You might have seen this on other websites. The part after # refers to a specific section of the page. For example, https://en.wikipedia.org/wiki/URL#Syntax opens in the Syntax section. In English, the part after # is called a fragment.
In the side menu, you'll see cells set for a location: green for open, red for closed, blue for camera, gray for hidden, and black for revealed cells. You can quickly select any of these groups. Just hold CTRL (CMD on MacOS) and click the colored label.
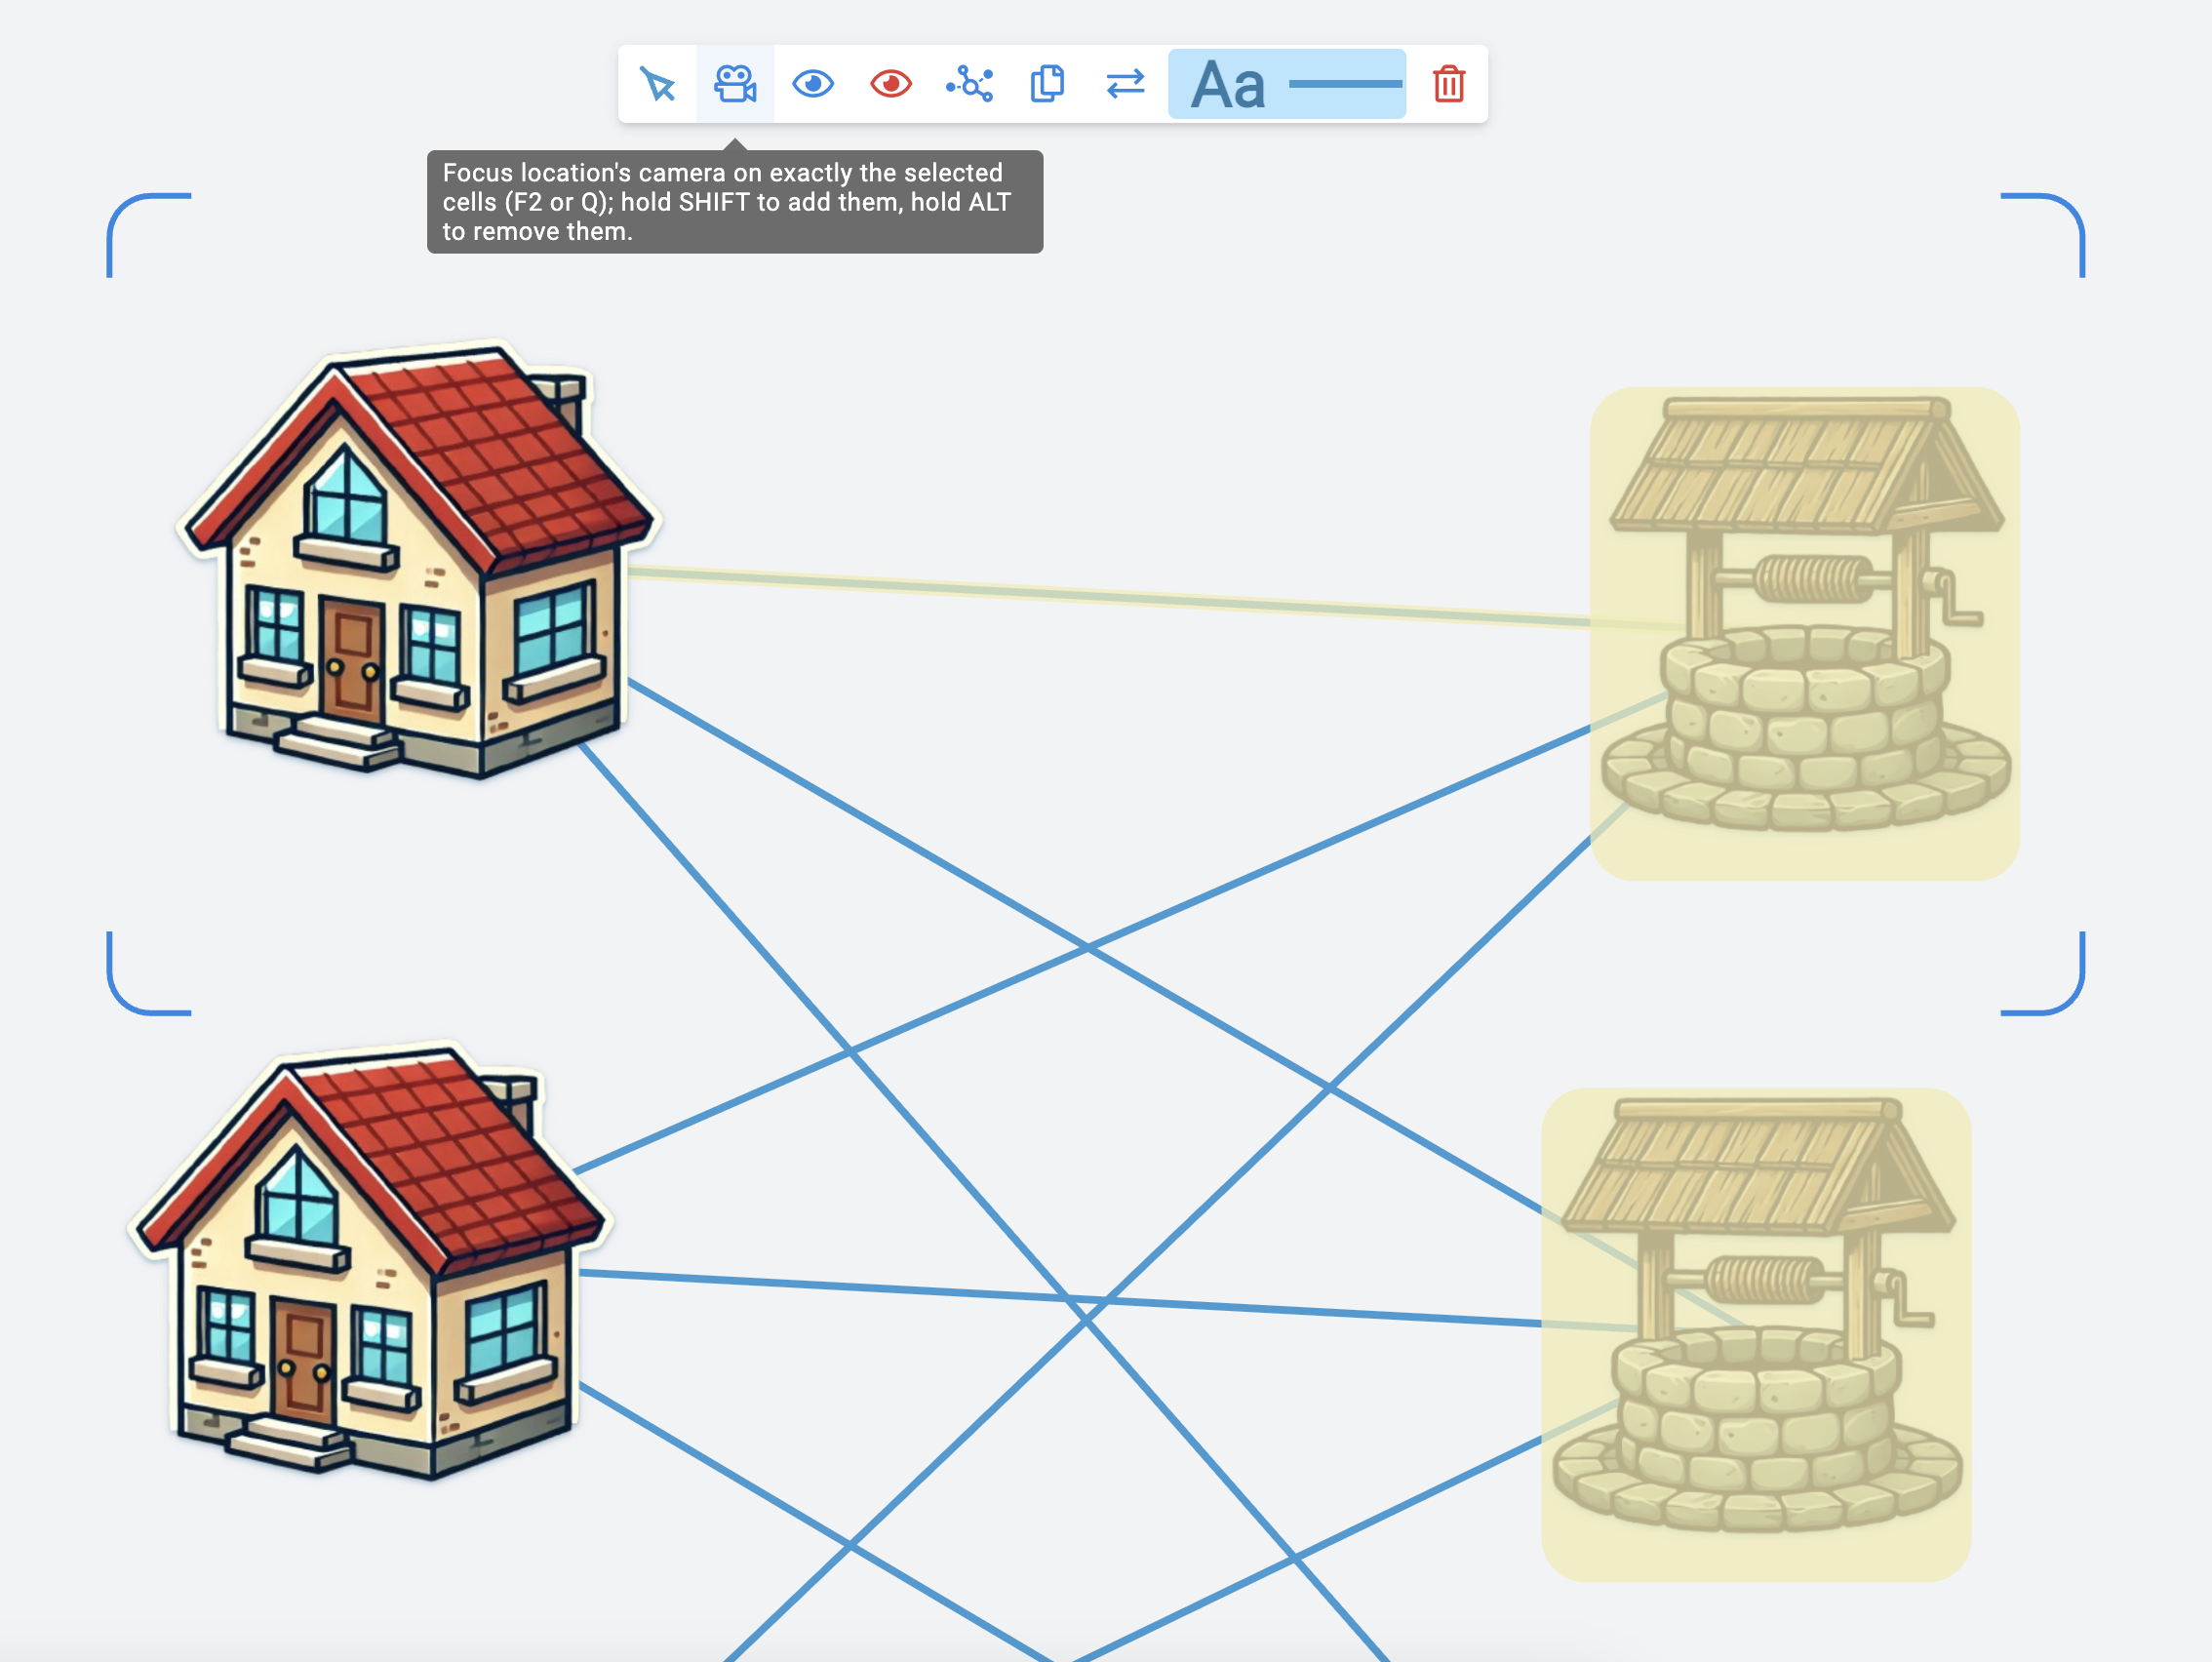
In a location, you choose which cells the camera will show. The camera zooms in to focus on those cells. They are displayed with a blue rectangle on the canvas and appear blue in the side menu.
To change the camera, select the cells in the normal way—for example, all inside a rectangle using SHIFT and dragging. Then click the camera button or press the F2 or Q keyboard shortcut. The camera is set exactly on the selected cells and the original settings are overwritten.
If you hold SHIFT while setting the camera, the selected cells are added to the existing camera. Holding ALT (OPTION on MacOS) removes the selected cells. If no cells are selected, hover over any cell and press F2 or Q to toggle it in the camera view.
A location also controls which cells are opened or closed. When editing a location, simply open these cells. It will also automatically set the camera on them and cancel their invisibility. If a cell has multiple pages, the currently selected one will be displayed.
Opening cells works best in view mode and can be done in bulk using selection. Opened cells appear green in the panel. If a cell is both opened and focused by the camera, it’s only marked once as green.
Locations only describe the change: they open cells but leave any previously opened cells as they are. This can be a little confusing since other cells are closed while editing the location.
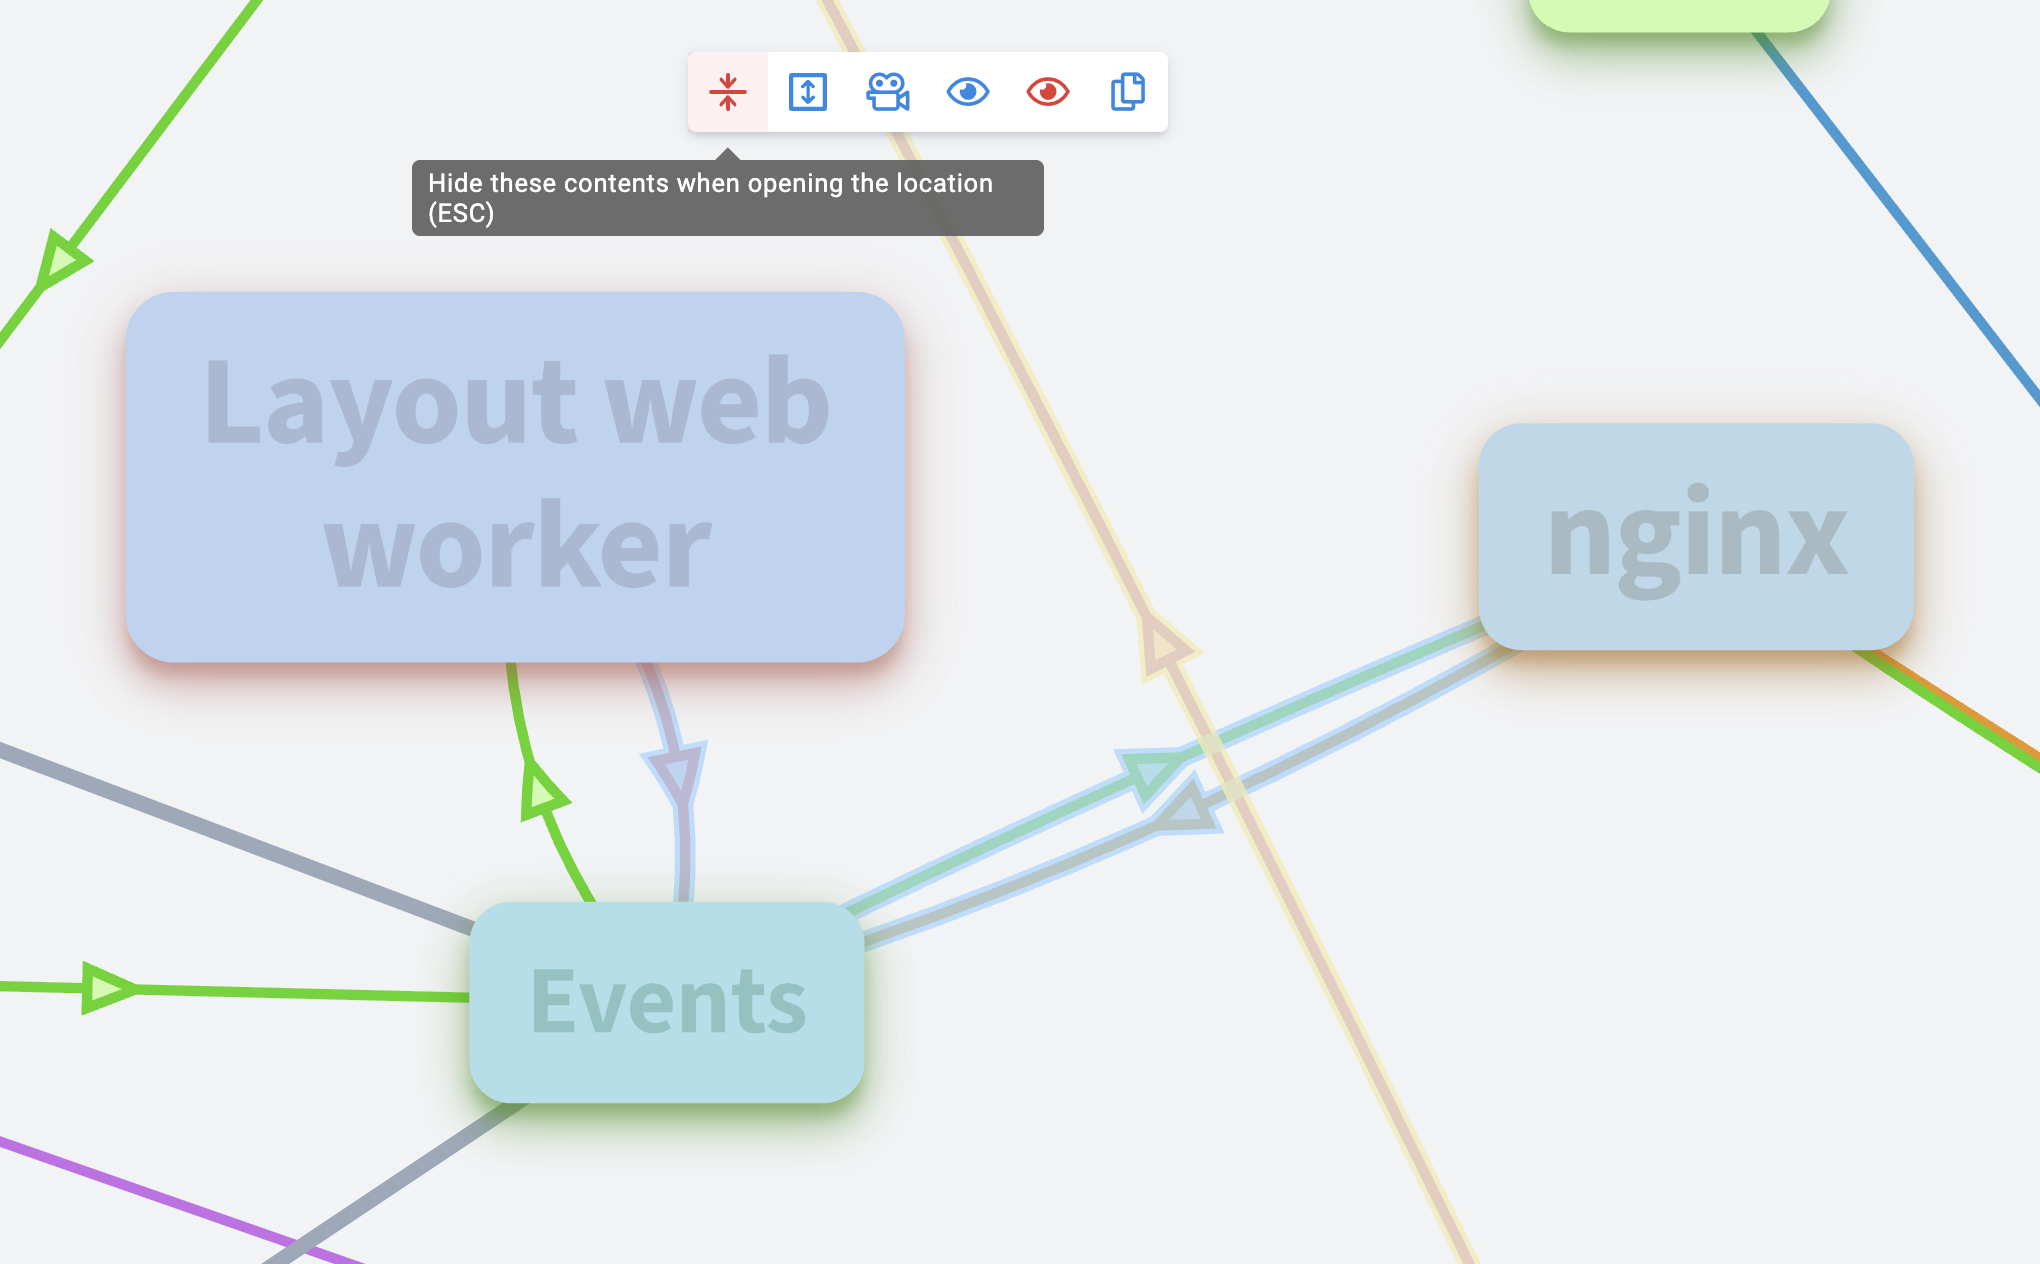
Sometimes you want to control which cells are closed. Just select these closed cells while editing the location. A new red button appears—this sets them to close when the location activates. You can also press ESCAPE to close them. Closed cells are shown in red in the side menu.
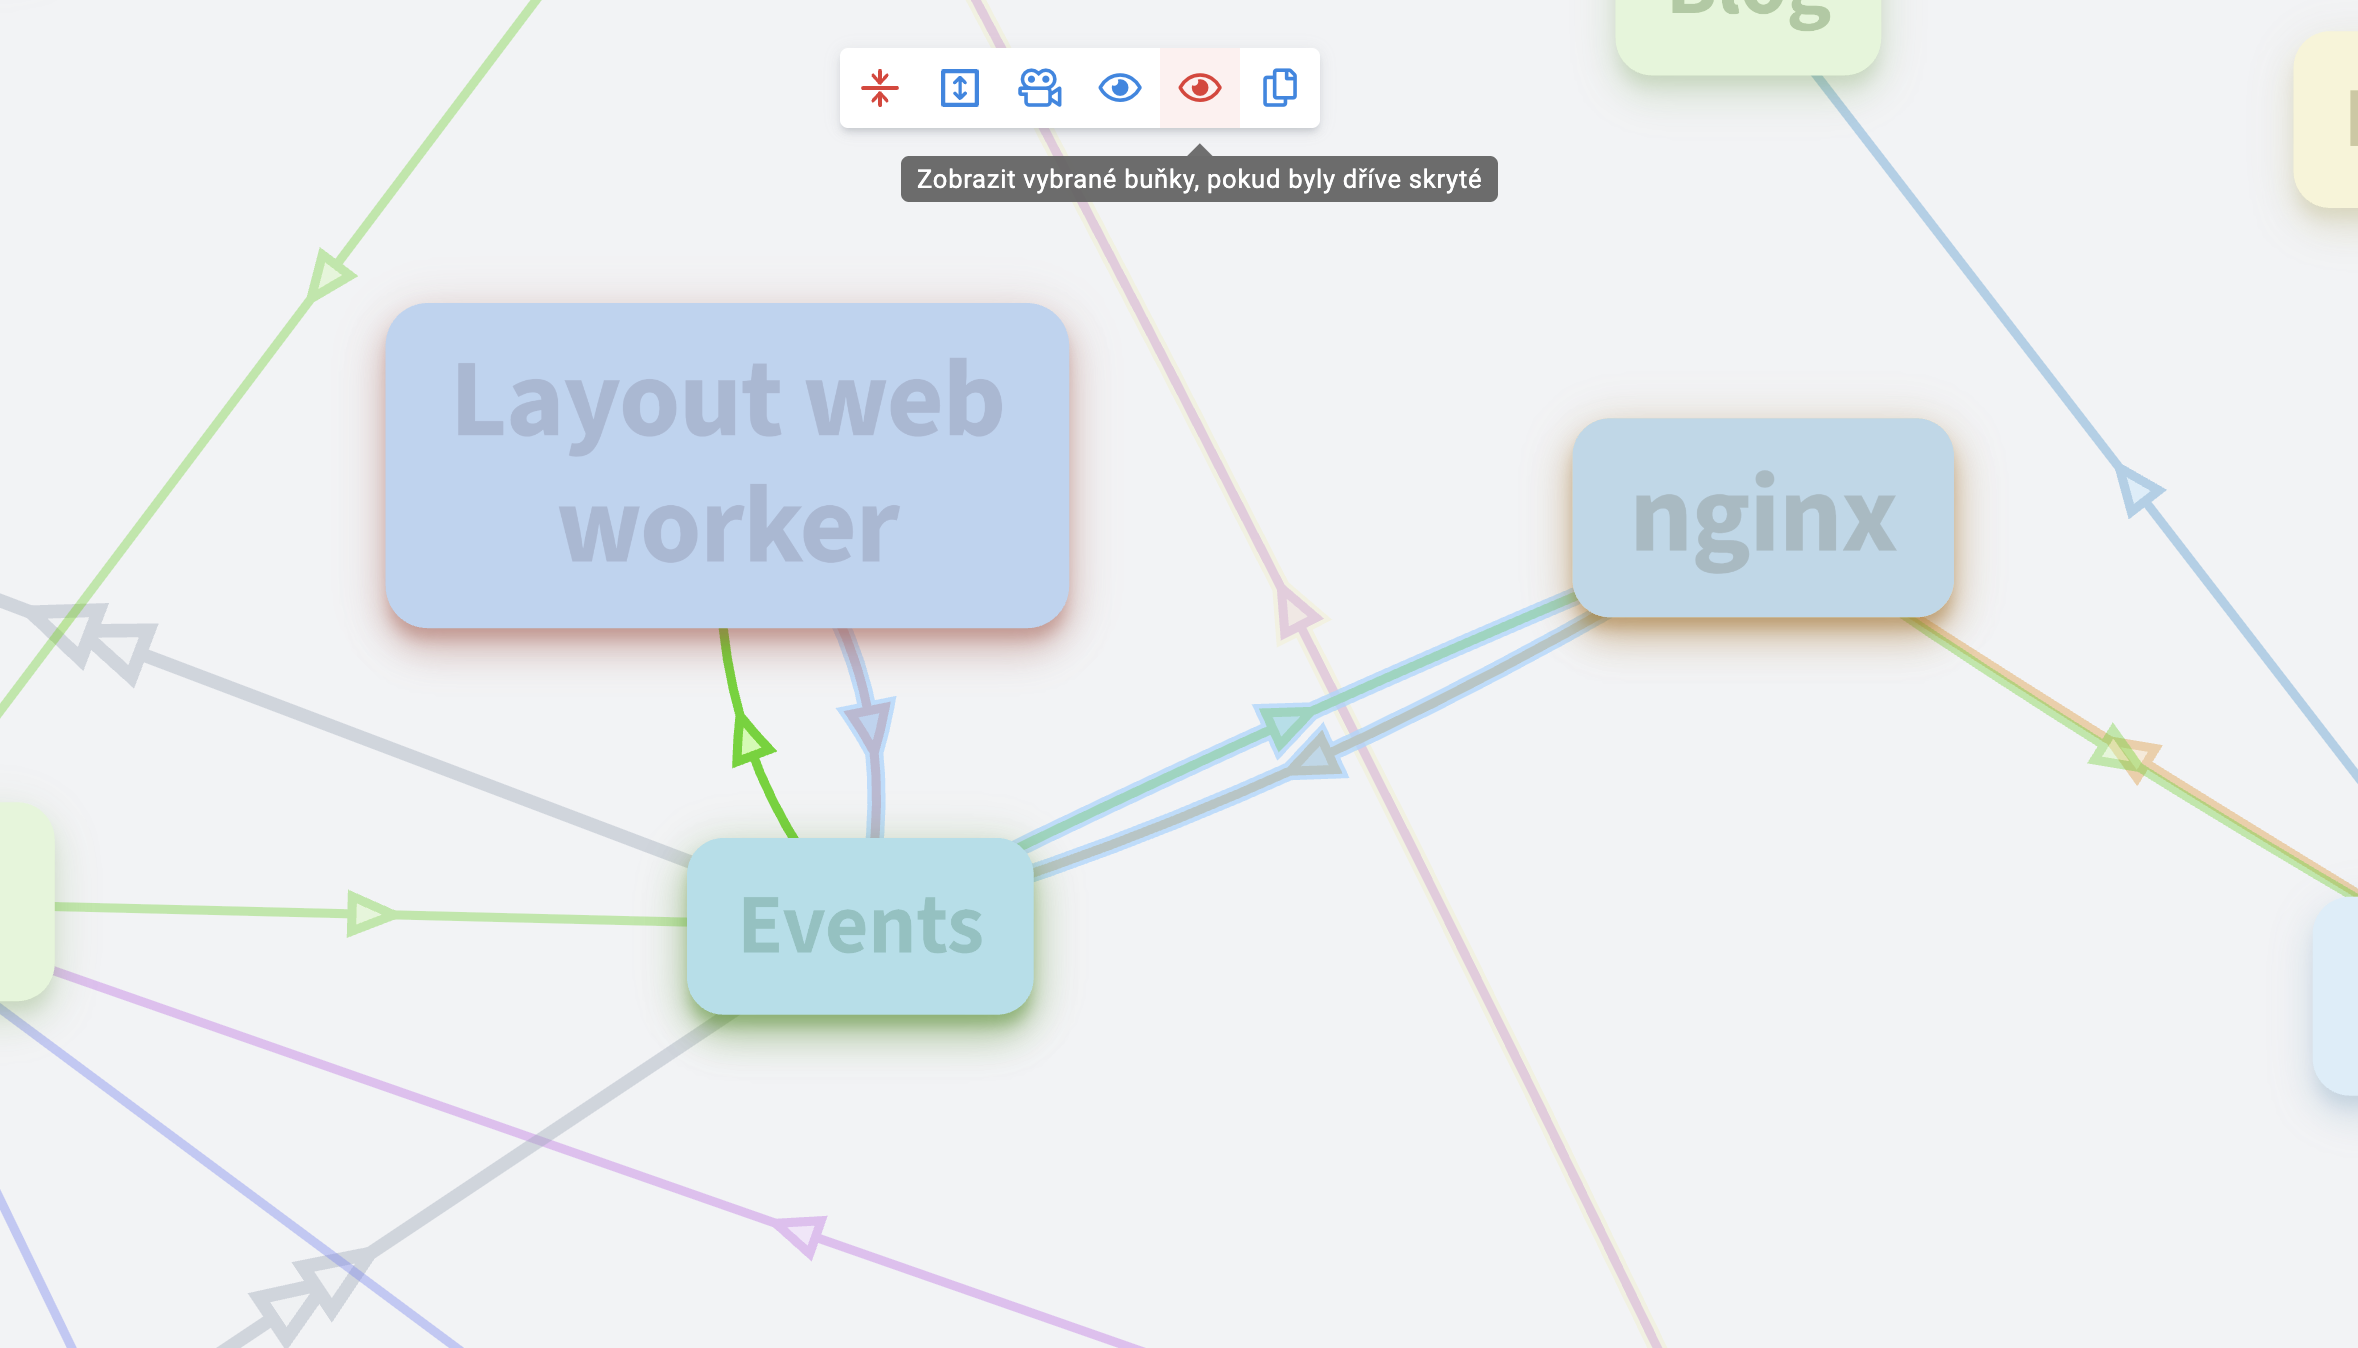
Just like in a presentation, a location can hide some cells—helpful if you want to show just a part and keep the rest out of sight. We want to stress out that when sharing a link to a location with hidden cells, people can still reveal them using the eye icon at the top.
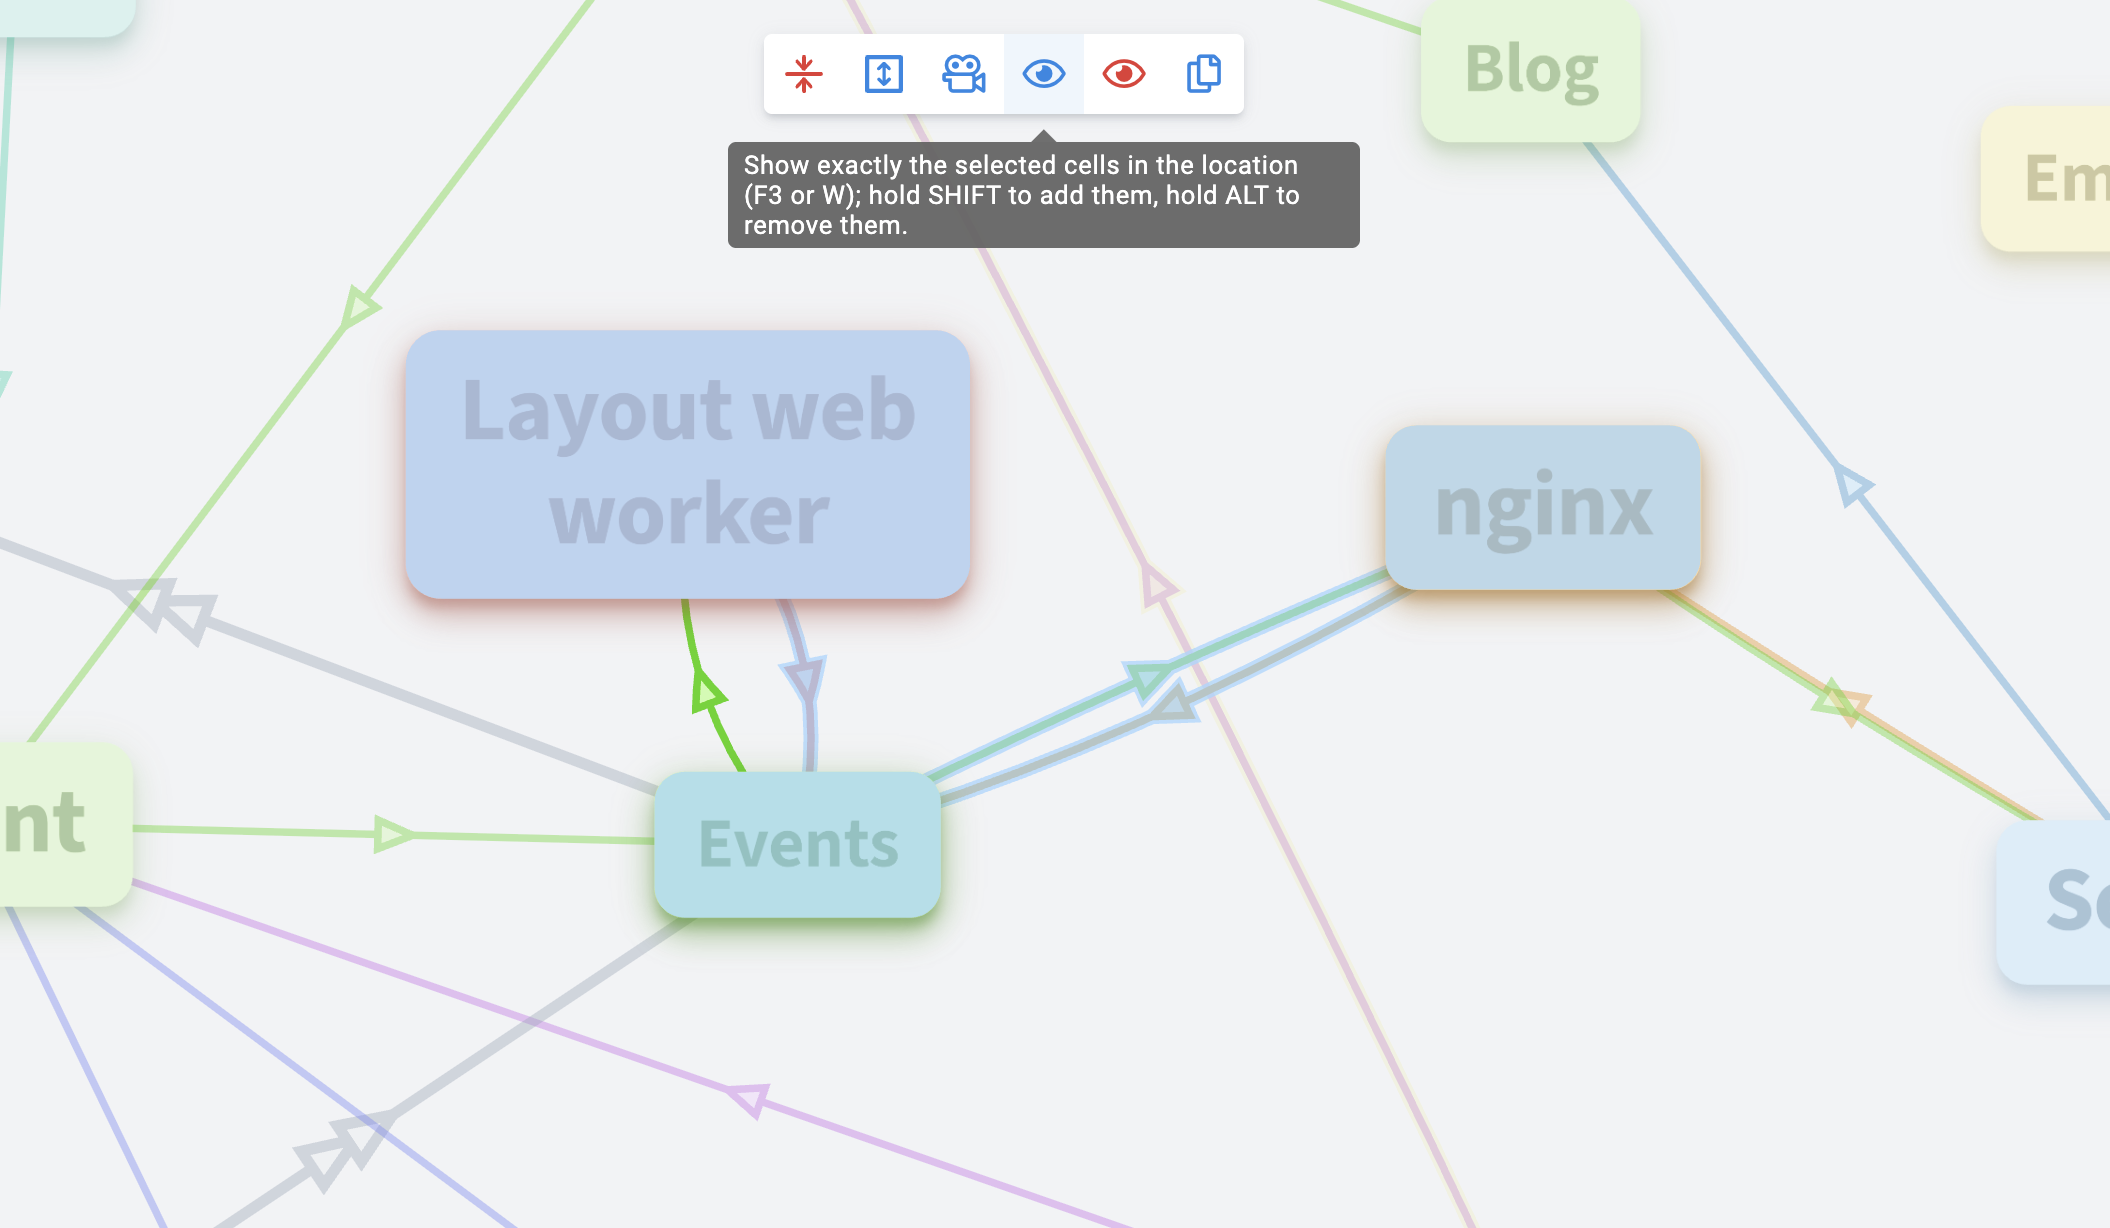
Hidden cells fade when editing a location. To choose which cells are visible, select them (for example, with SHIFT + drag), then use the eye icon or press F3 or W. Only those cells are now visible; the others become hidden.
As with the camera settings, if you hold SHIFT, the selected cells are added to the visible ones. If you hold ALT, the selected cells become hidden. If no cells are selected and you hover over a cell with the mouse, the F3 and W keyboard shortcuts toggle its visibility.
As with opening cells, hiding only updates newly hidden cells. Any others hidden by previous locations remain hidden. To ensure that some cells are revealed when the location is activated, select them and use the red eye icon. Revealed cells are shown black in the side menu, hidden ones are gray.
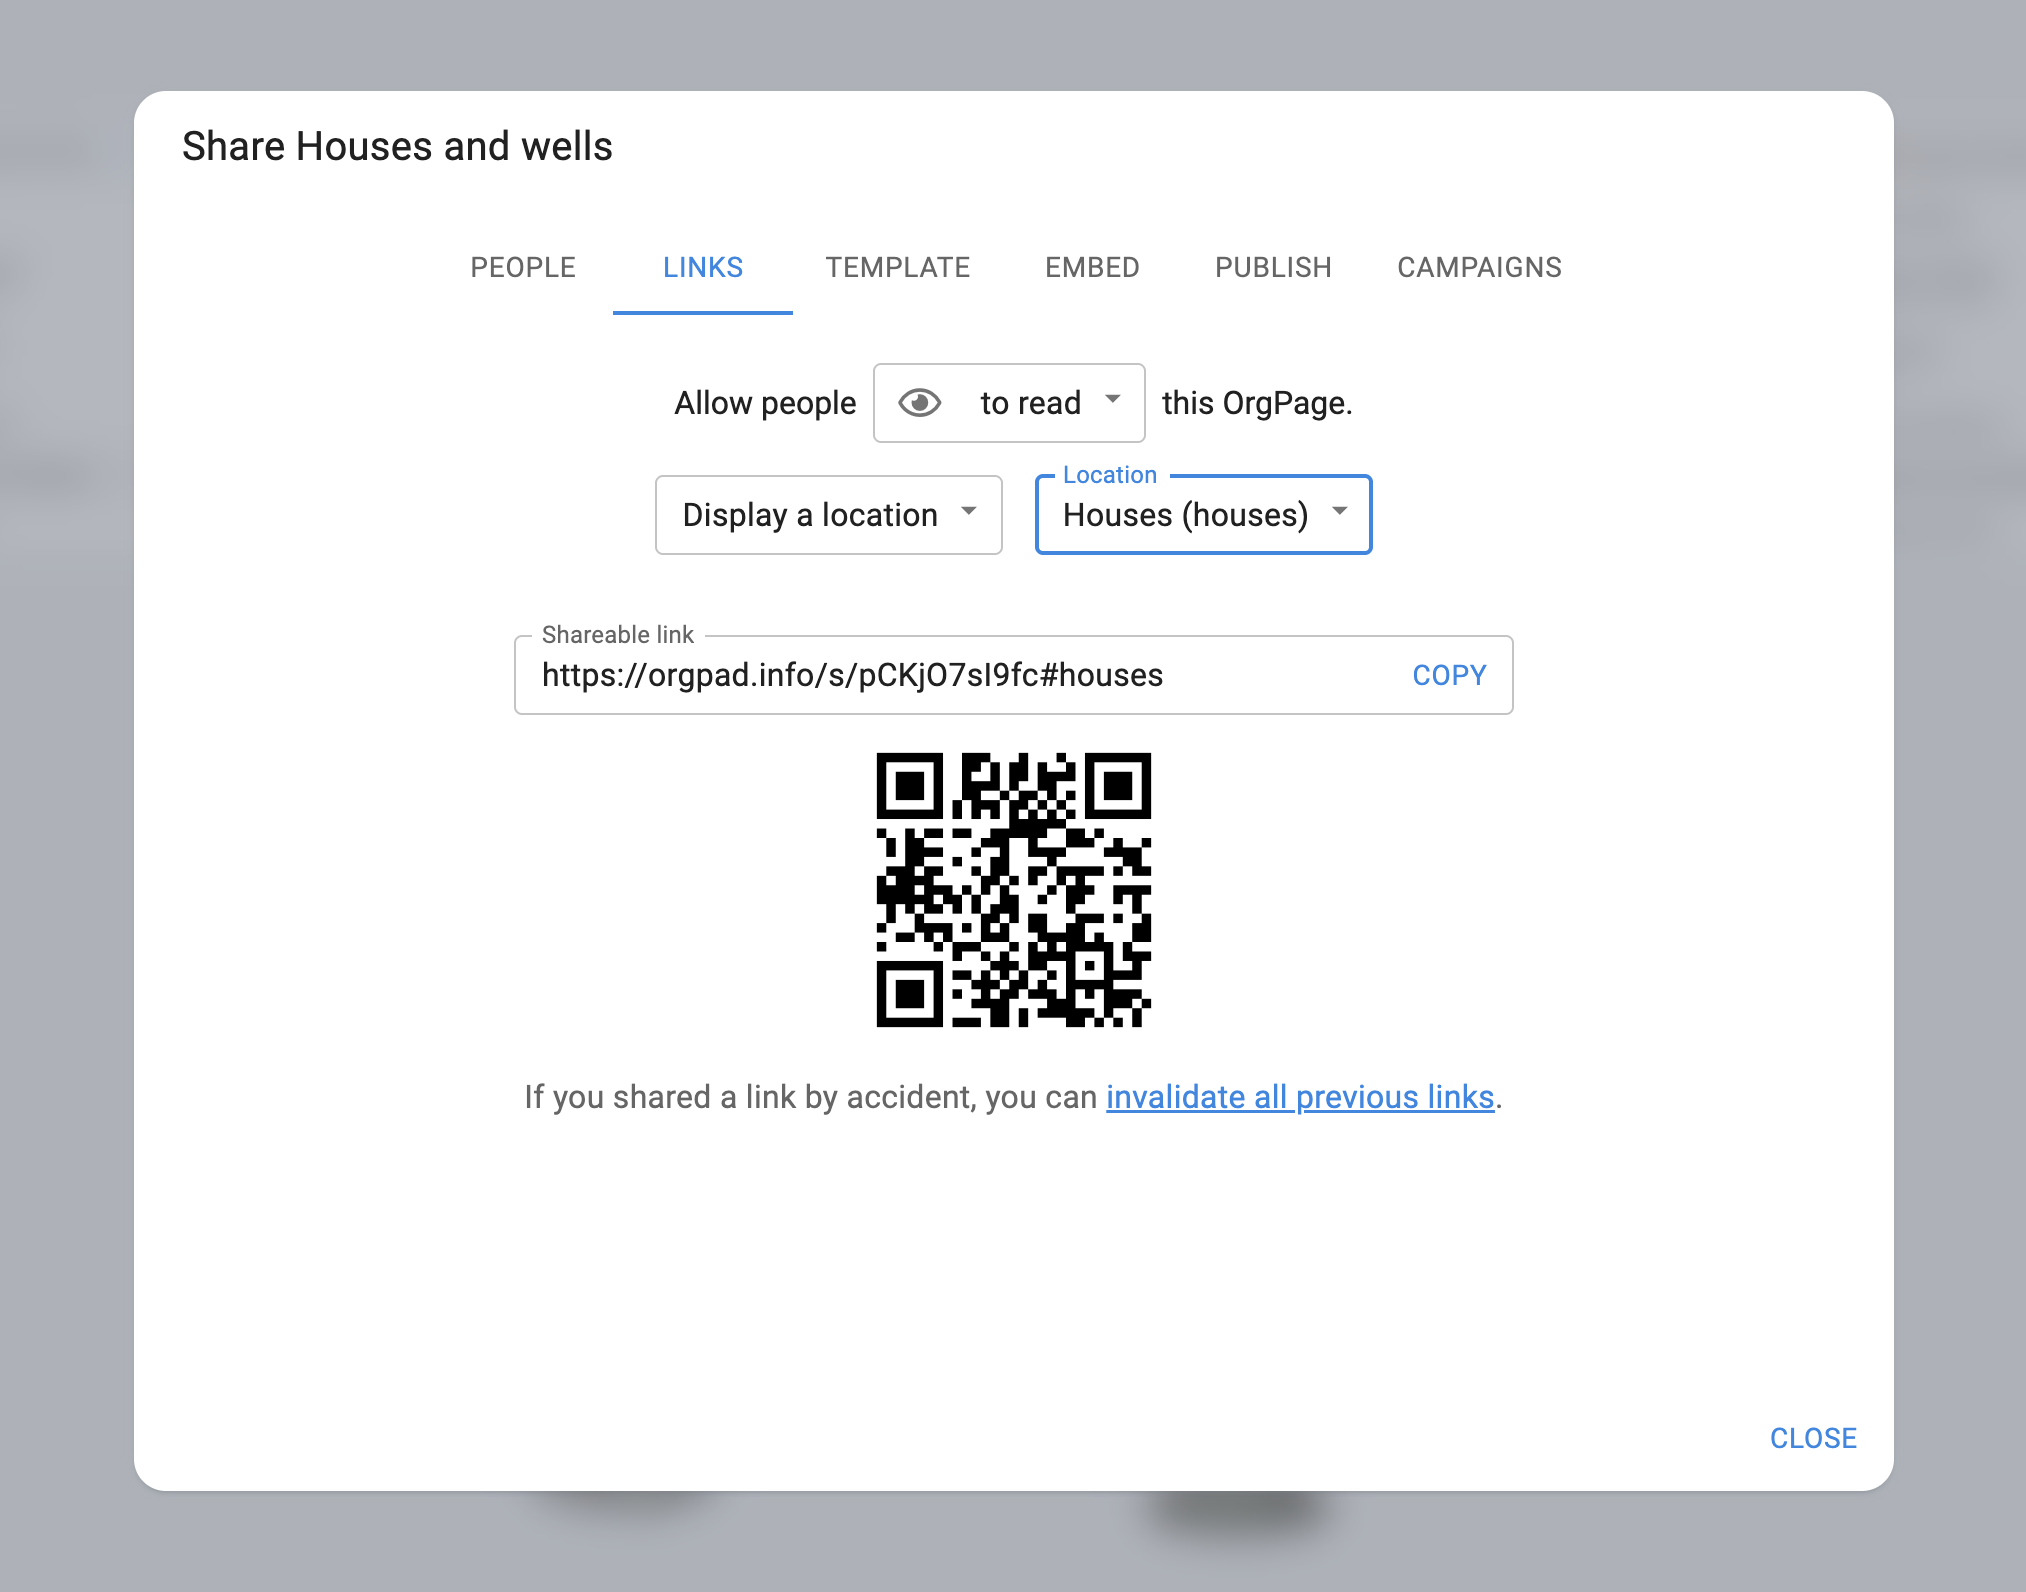
It’s easy to share locations. Open the share dialog and select the “Links” tab. If there’s at least one location in your OrgPage, you’ll see a new “Show Location” option. By selecting a location, its ID is added to the link and its QR code. If you open the share dialog while editing a location, it will automatically show the “Links” tab and pick that location for you—this context-aware behavior saves time.
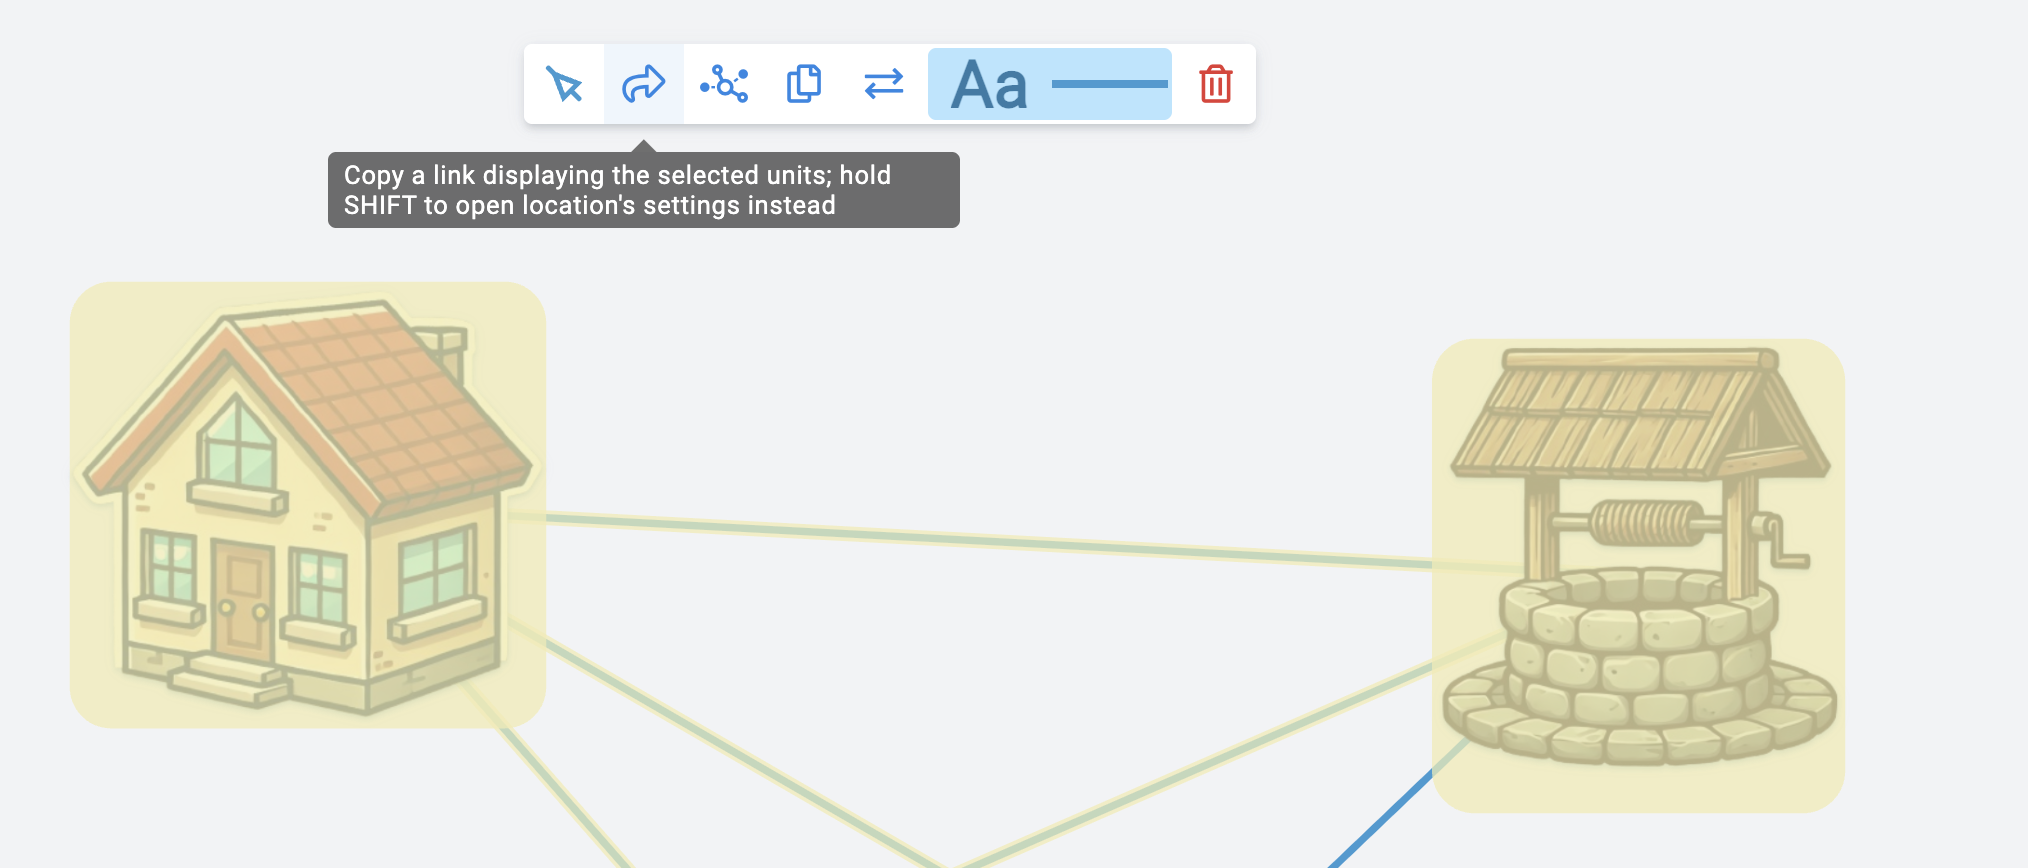
There’s an even quicker way to share one or more cells. Just select the cells and click the new share button. The copied link will point to a location that focuses the camera exactly on the selected cells. If any are open, they’ll be opened in the location too.
If a matching location already exists, its link is used. Otherwise, a new location is created with a random ID. Hold SHIFT while clicking to open this location for editing. You can adjust or rename it as needed.
Also, there are implicit locations that are automatically created for each OrgPage. Every created cell, link, etc. in OrgPad is assigned a random unique identifier UUIDv4. Such an identifier is typically written in hexadecimal, for example, 123e4567-e89b-12d3-a456-426655440000. However, OrgPad also supports a shorter version ASPkVn6JsS06RWQmZVRAAA written using 64 distinct characters, called base64 encoding.
You won’t normally see these IDs, but they can be found in the OrgPage data or using the built-in debugger (CTRL+F12 or CMD+F12 on MacOS). These IDs form the following implicit locations:
You can also share an implicit location, even if you only have read access to the document. But you won't be able to create a new location in this case.
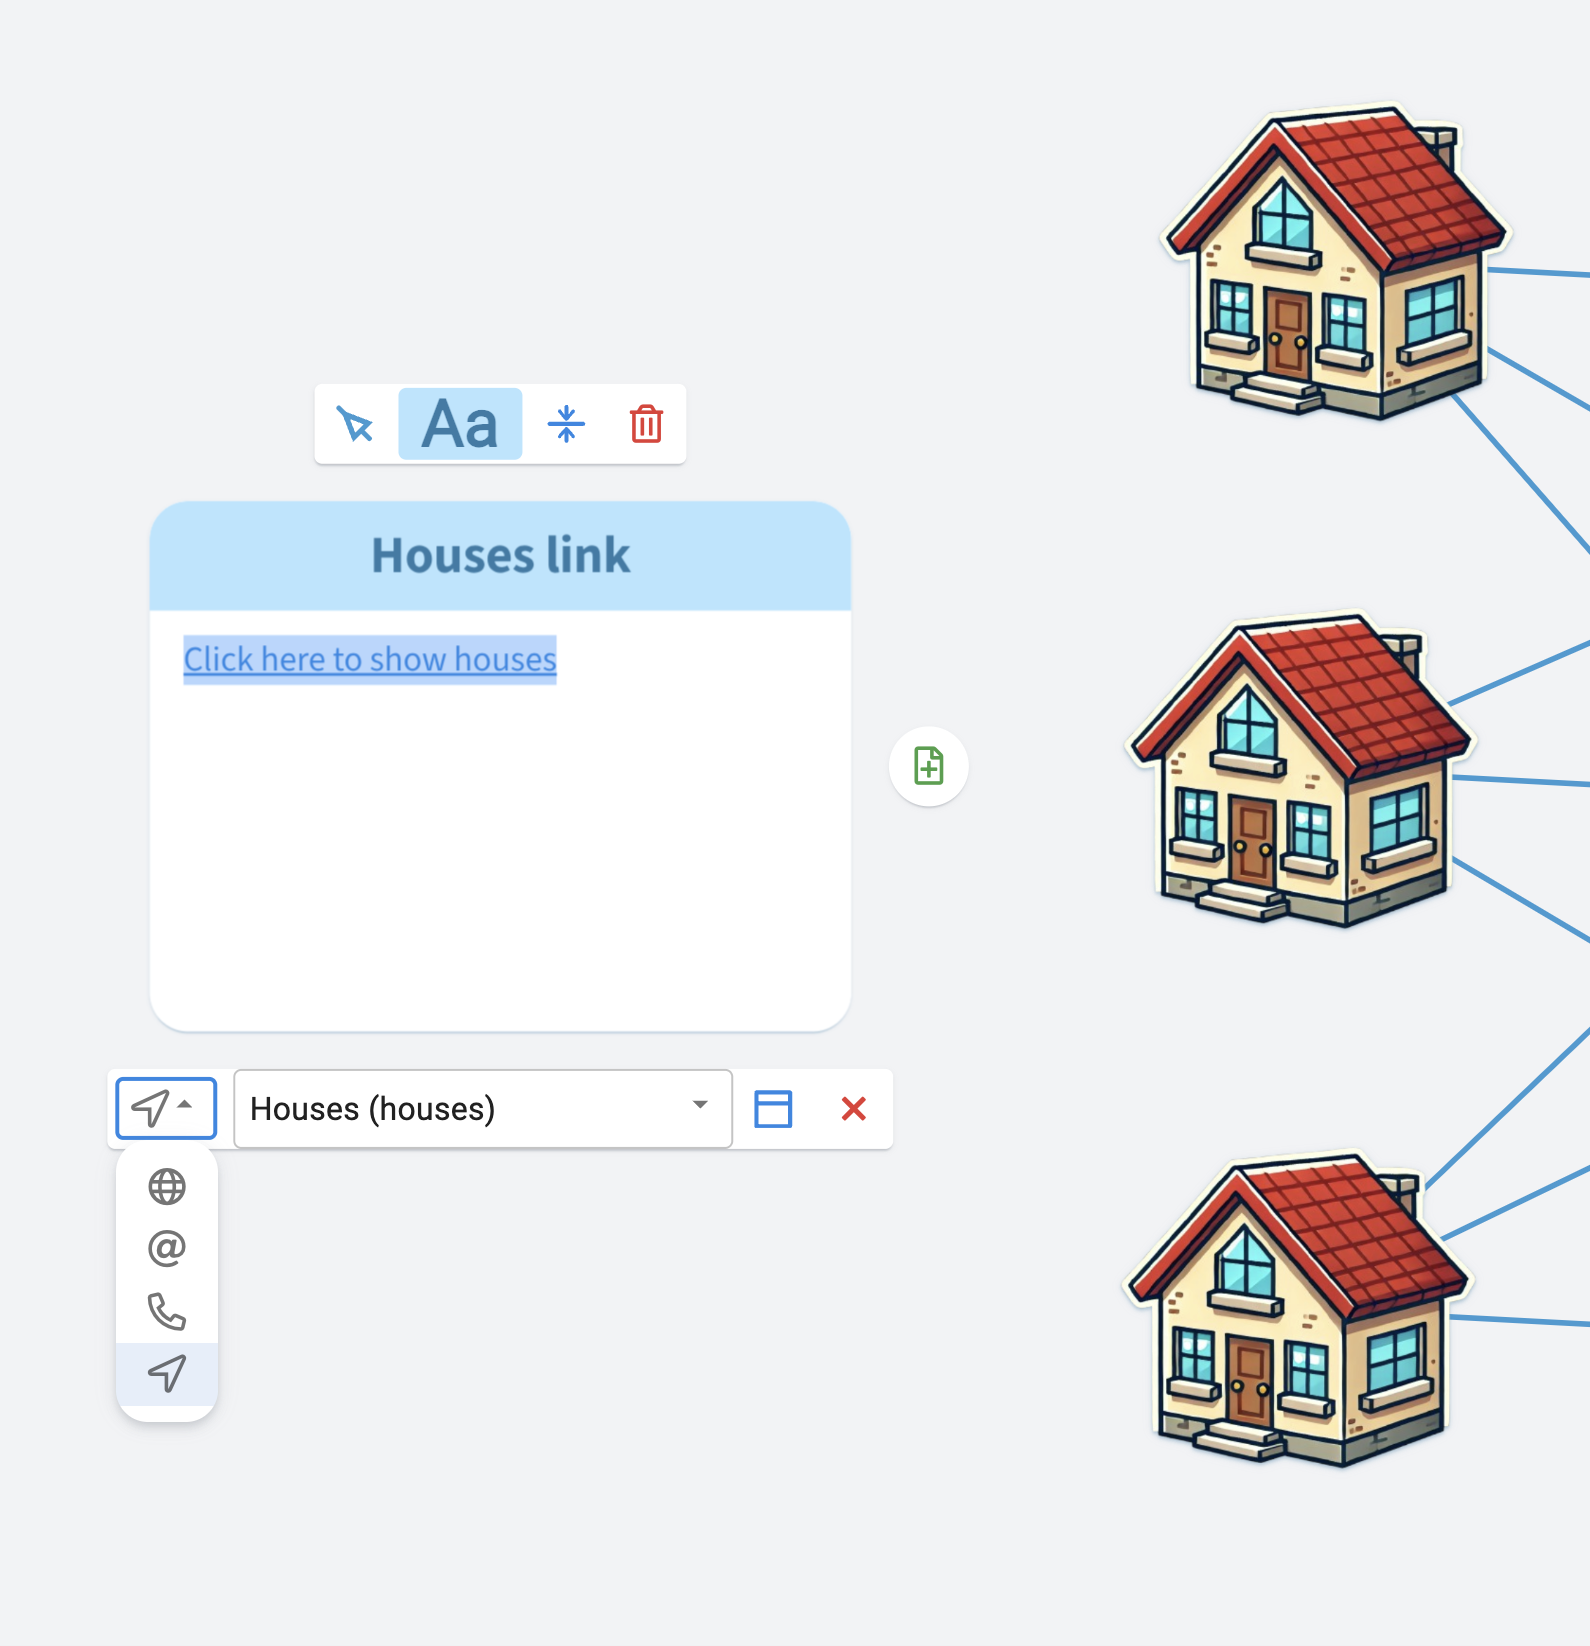
You can also use locations as links or embedded content inside cells. If a link leads to a location within the same OrgPage, clicking it moves the camera instead of opening a new browser tab. Embedding a location lets you show that part of the OrgPage directly in another cell.
To embed a location, copy its link and paste it using CTRL+V (CMD+V on MacOS) into a blank space or an existing cell. You can convert the embedded location to a link using the link button. Alternatively, you can also create a location link directly by typing # and the location’s ID in the link address, or by selecting location as the link type and choosing it from the list.
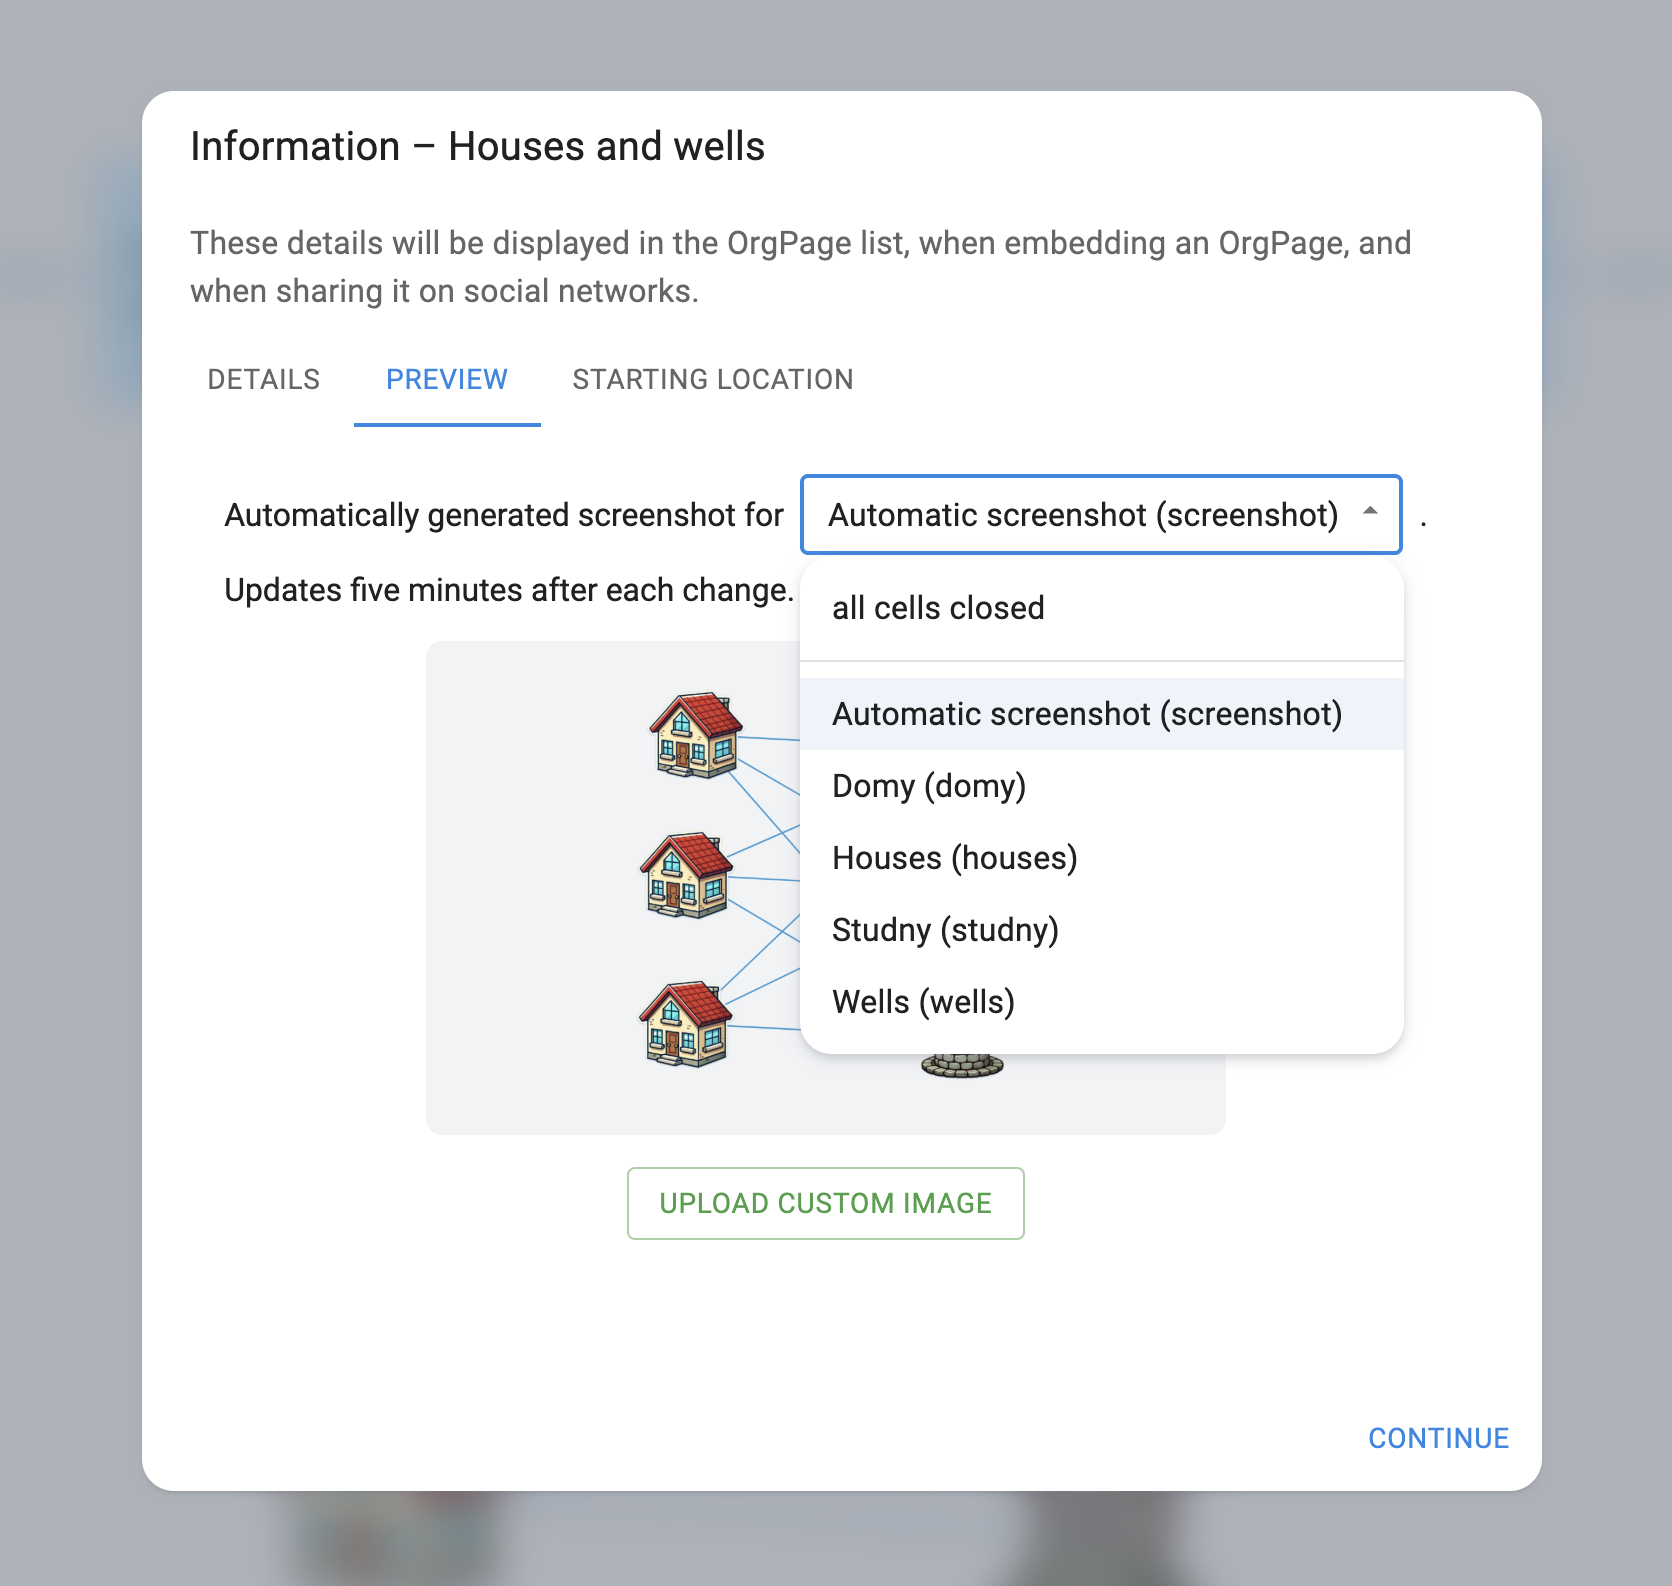
Do you want your OrgPage to always open exactly how you want? With the starting location, you can set specific cells to be shown, opened, or remain hidden. For example, you can highlight the main idea, show people where to start, or tailor the view for mobile which opens in portrait mode.
You have full control over what people see when they open the document.
OrgPad automatically creates a preview image for every OrgPage. It is updated within five minutes of any change. You’ll see this preview in your OrgPage list and when sharing on social media.
Similarly to starting with a location, you set the preview in the OrgPage information dialog. Switch to the “Preview” tab, where you can upload a custom image or choose a location for the preview.
When setting a location, you can choose which cells should be visible and opened. You can hide the rest to keep the preview clean and focused on what matters most.
For example, in the OrgPage with houses and wells, we can display only the houses and wells in the preview but show extra instruction cells when the OrgPage opens.
You can print OrgPages as PDFs—just open the side menu and select “Print to PDF.” Professional and school accounts get watermark-free PDFs.
This prints just the part of your OrgPage you picked—with camera, open cells, and hidden details as you set them.
For example, here’s the printed location used as the preview for the OrgPage  Houses and wells.
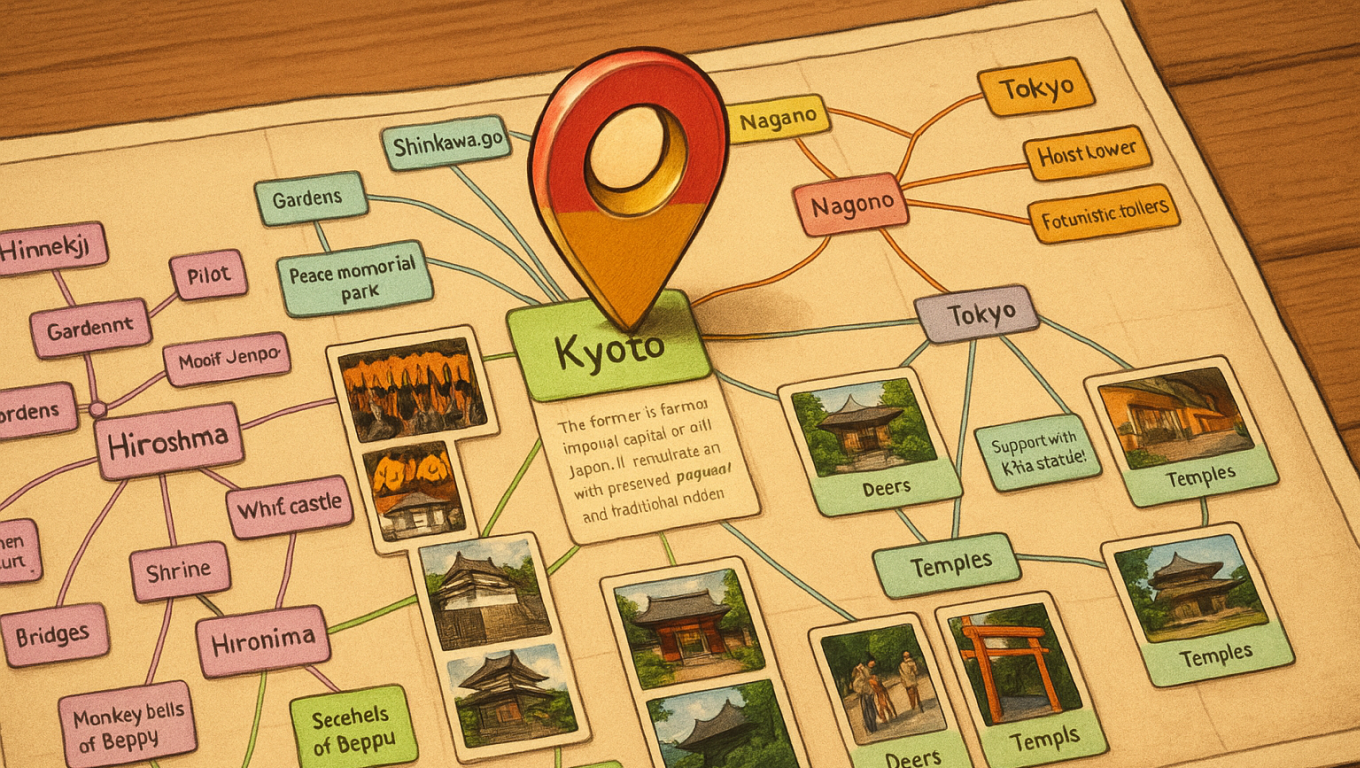
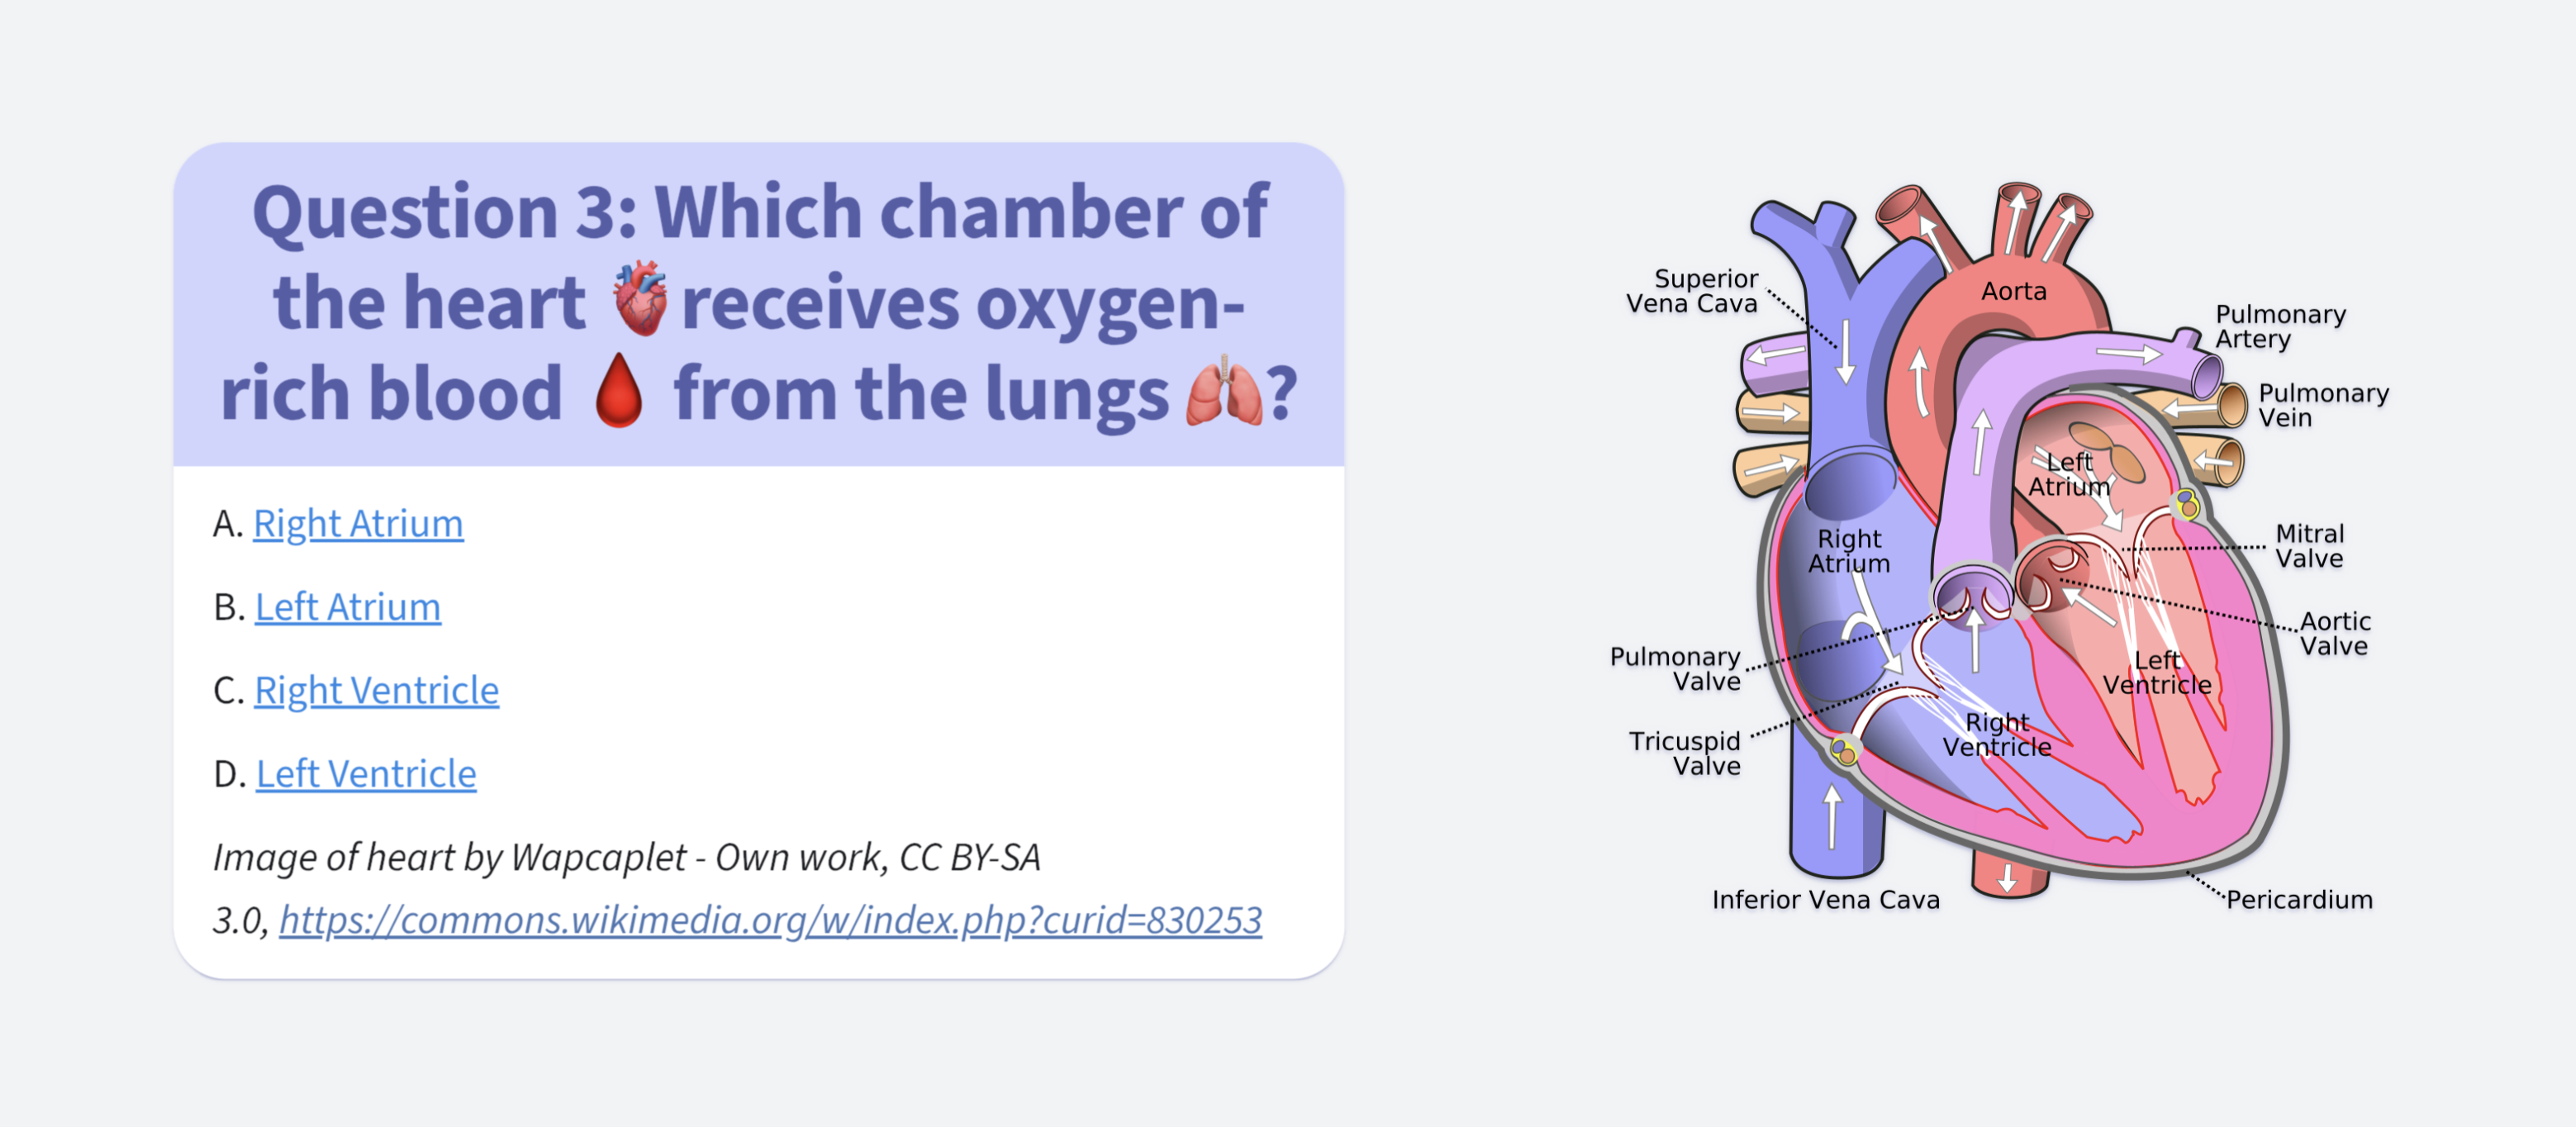
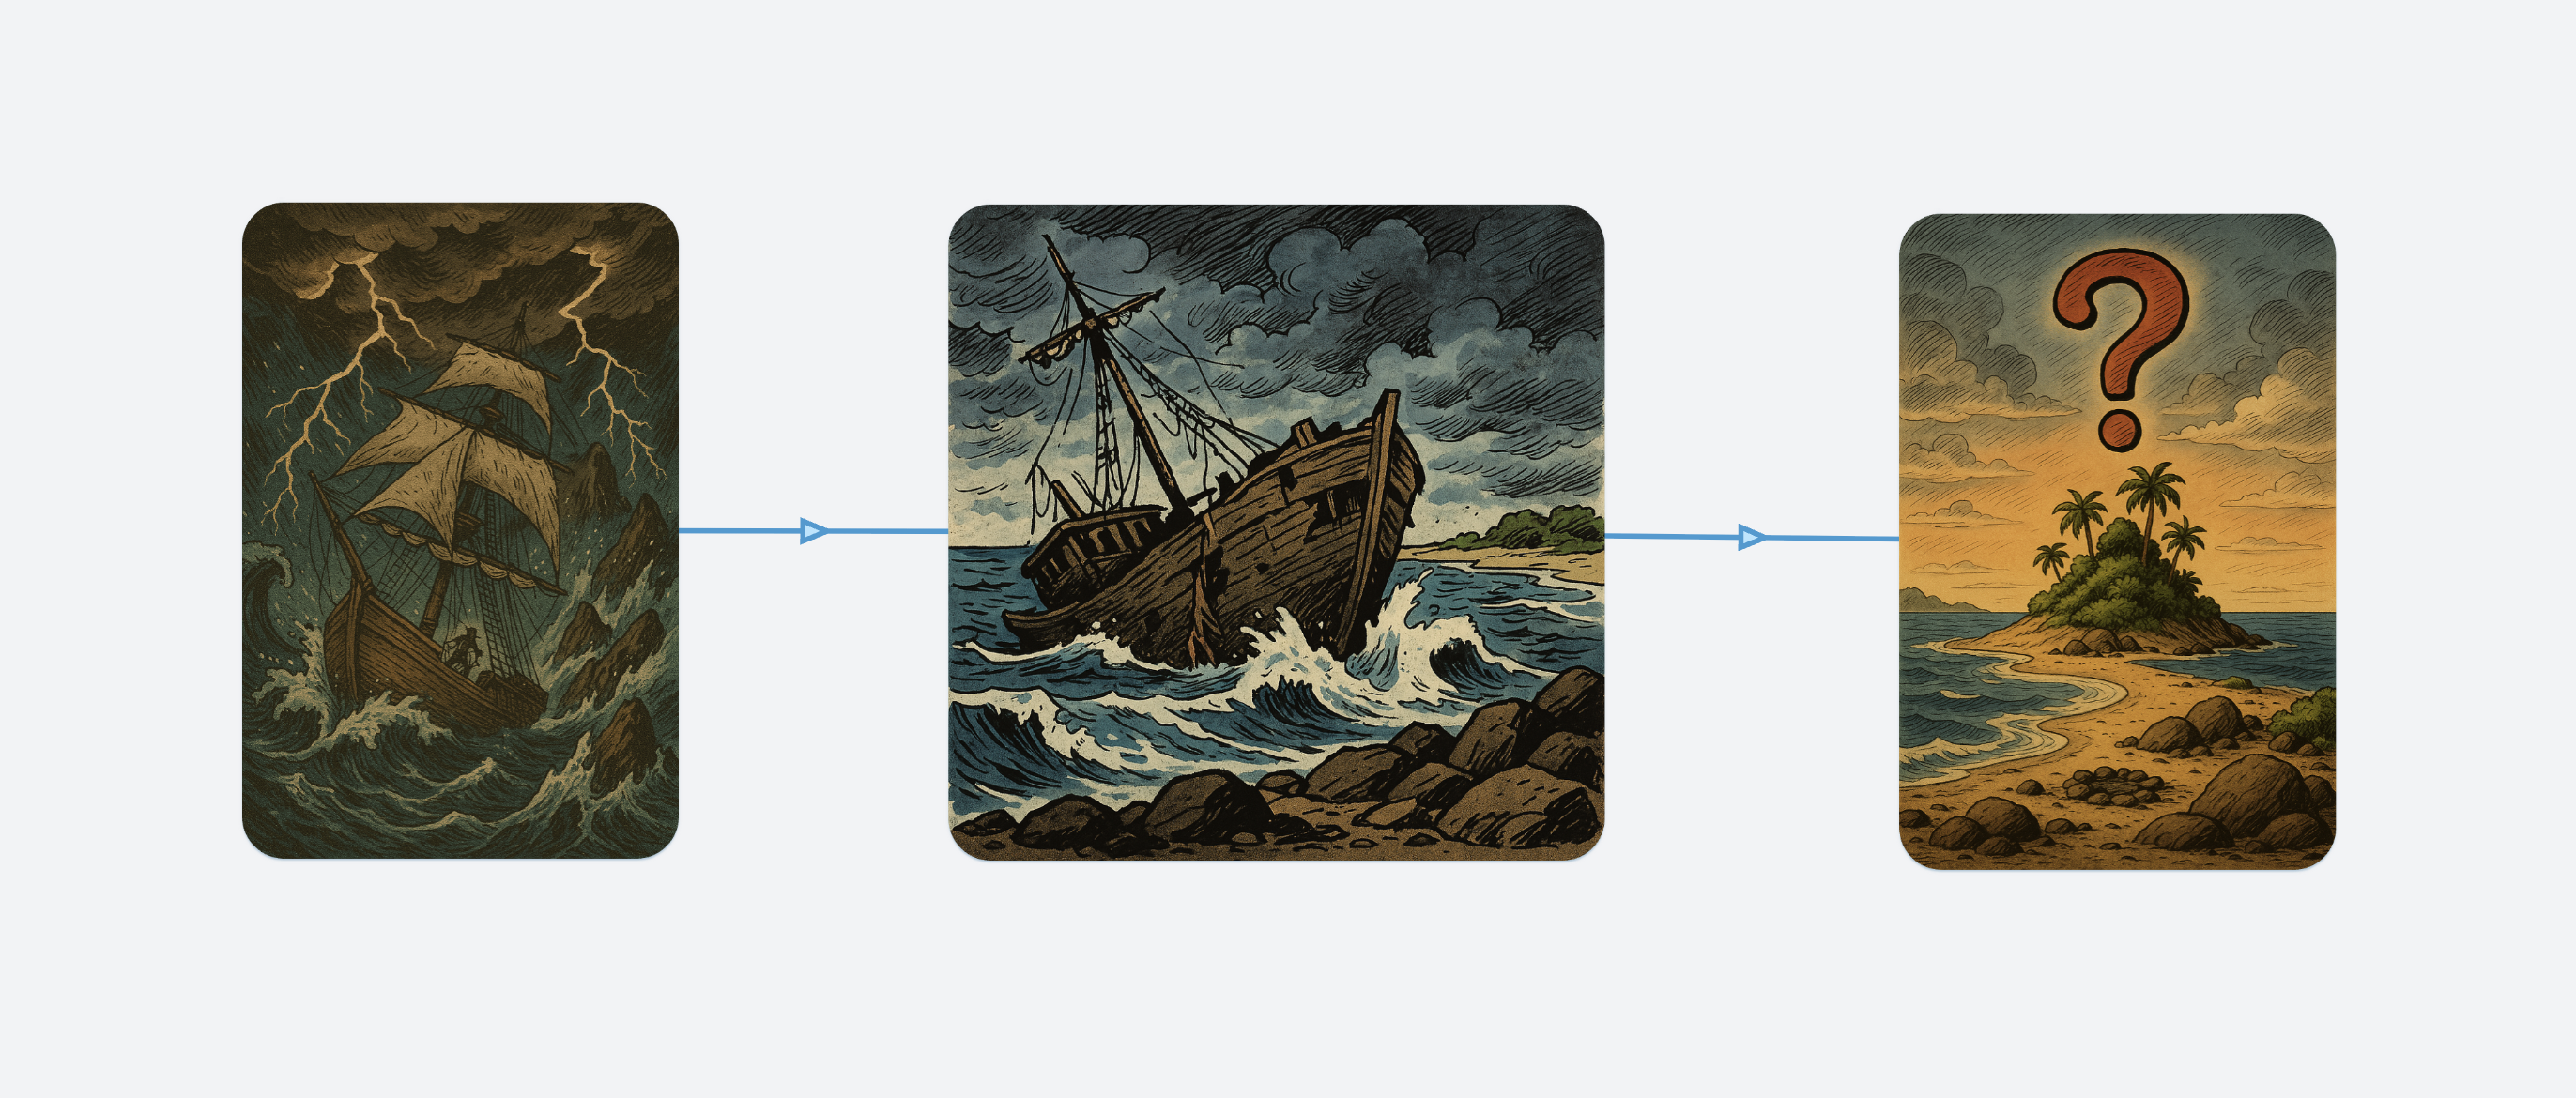
We’ve created three example OrgPages to show different ways you can use locations: a quiz, an interactive story, and a simple game. Each one highlights a different idea, making it easier to imagine what you can build with locations. You can copy these documents and play around with them to create your own. Just select “Copy to New OrgPage” from the side menu. It’s an easy way to try out how locations work—and maybe come up with your own creative use for them.
We’ve prepared a simple quiz consisting of five questions. Click an answer to check if it’s correct and get an explanation. You can move on to the next question or go back and try other answers. At the end, you’ll see an overview of all questions and your picks. This OrgPage uses locations to keep most cells hidden at the start. Clicking an answer or “next” triggers a location to reveal more and move the camera.
Locations allow you to create interactive stories with branching paths based on your choices. We built one such adventure in which you’re shipwrecked on a deserted island during a storm. Both the story and the pictures were made with ChatGPT. We also generated AI audio with ElevenLabs. The overall ambience during the reading is enhanced by music and sound effects that are switched by locations. When you open this OrgPage, you’ll need to start audio tracks manually because of browser restrictions. After that, they will switch automatically as you go. Zooming out reveals a map of the island revealed as you explore.
OrgPad already offers match pairs OrgPages you can copy and play. Usually, you flip cards and move or delete them when you find a match. With locations, you can play right in the view mode. Just click “Match” for a found pair, and locations will hide them. Our sample document practices English fruit names: one card has a picture, the other one has the English word, and there’s a “Match” button—for example, a picture of an apple and the word “apple.”
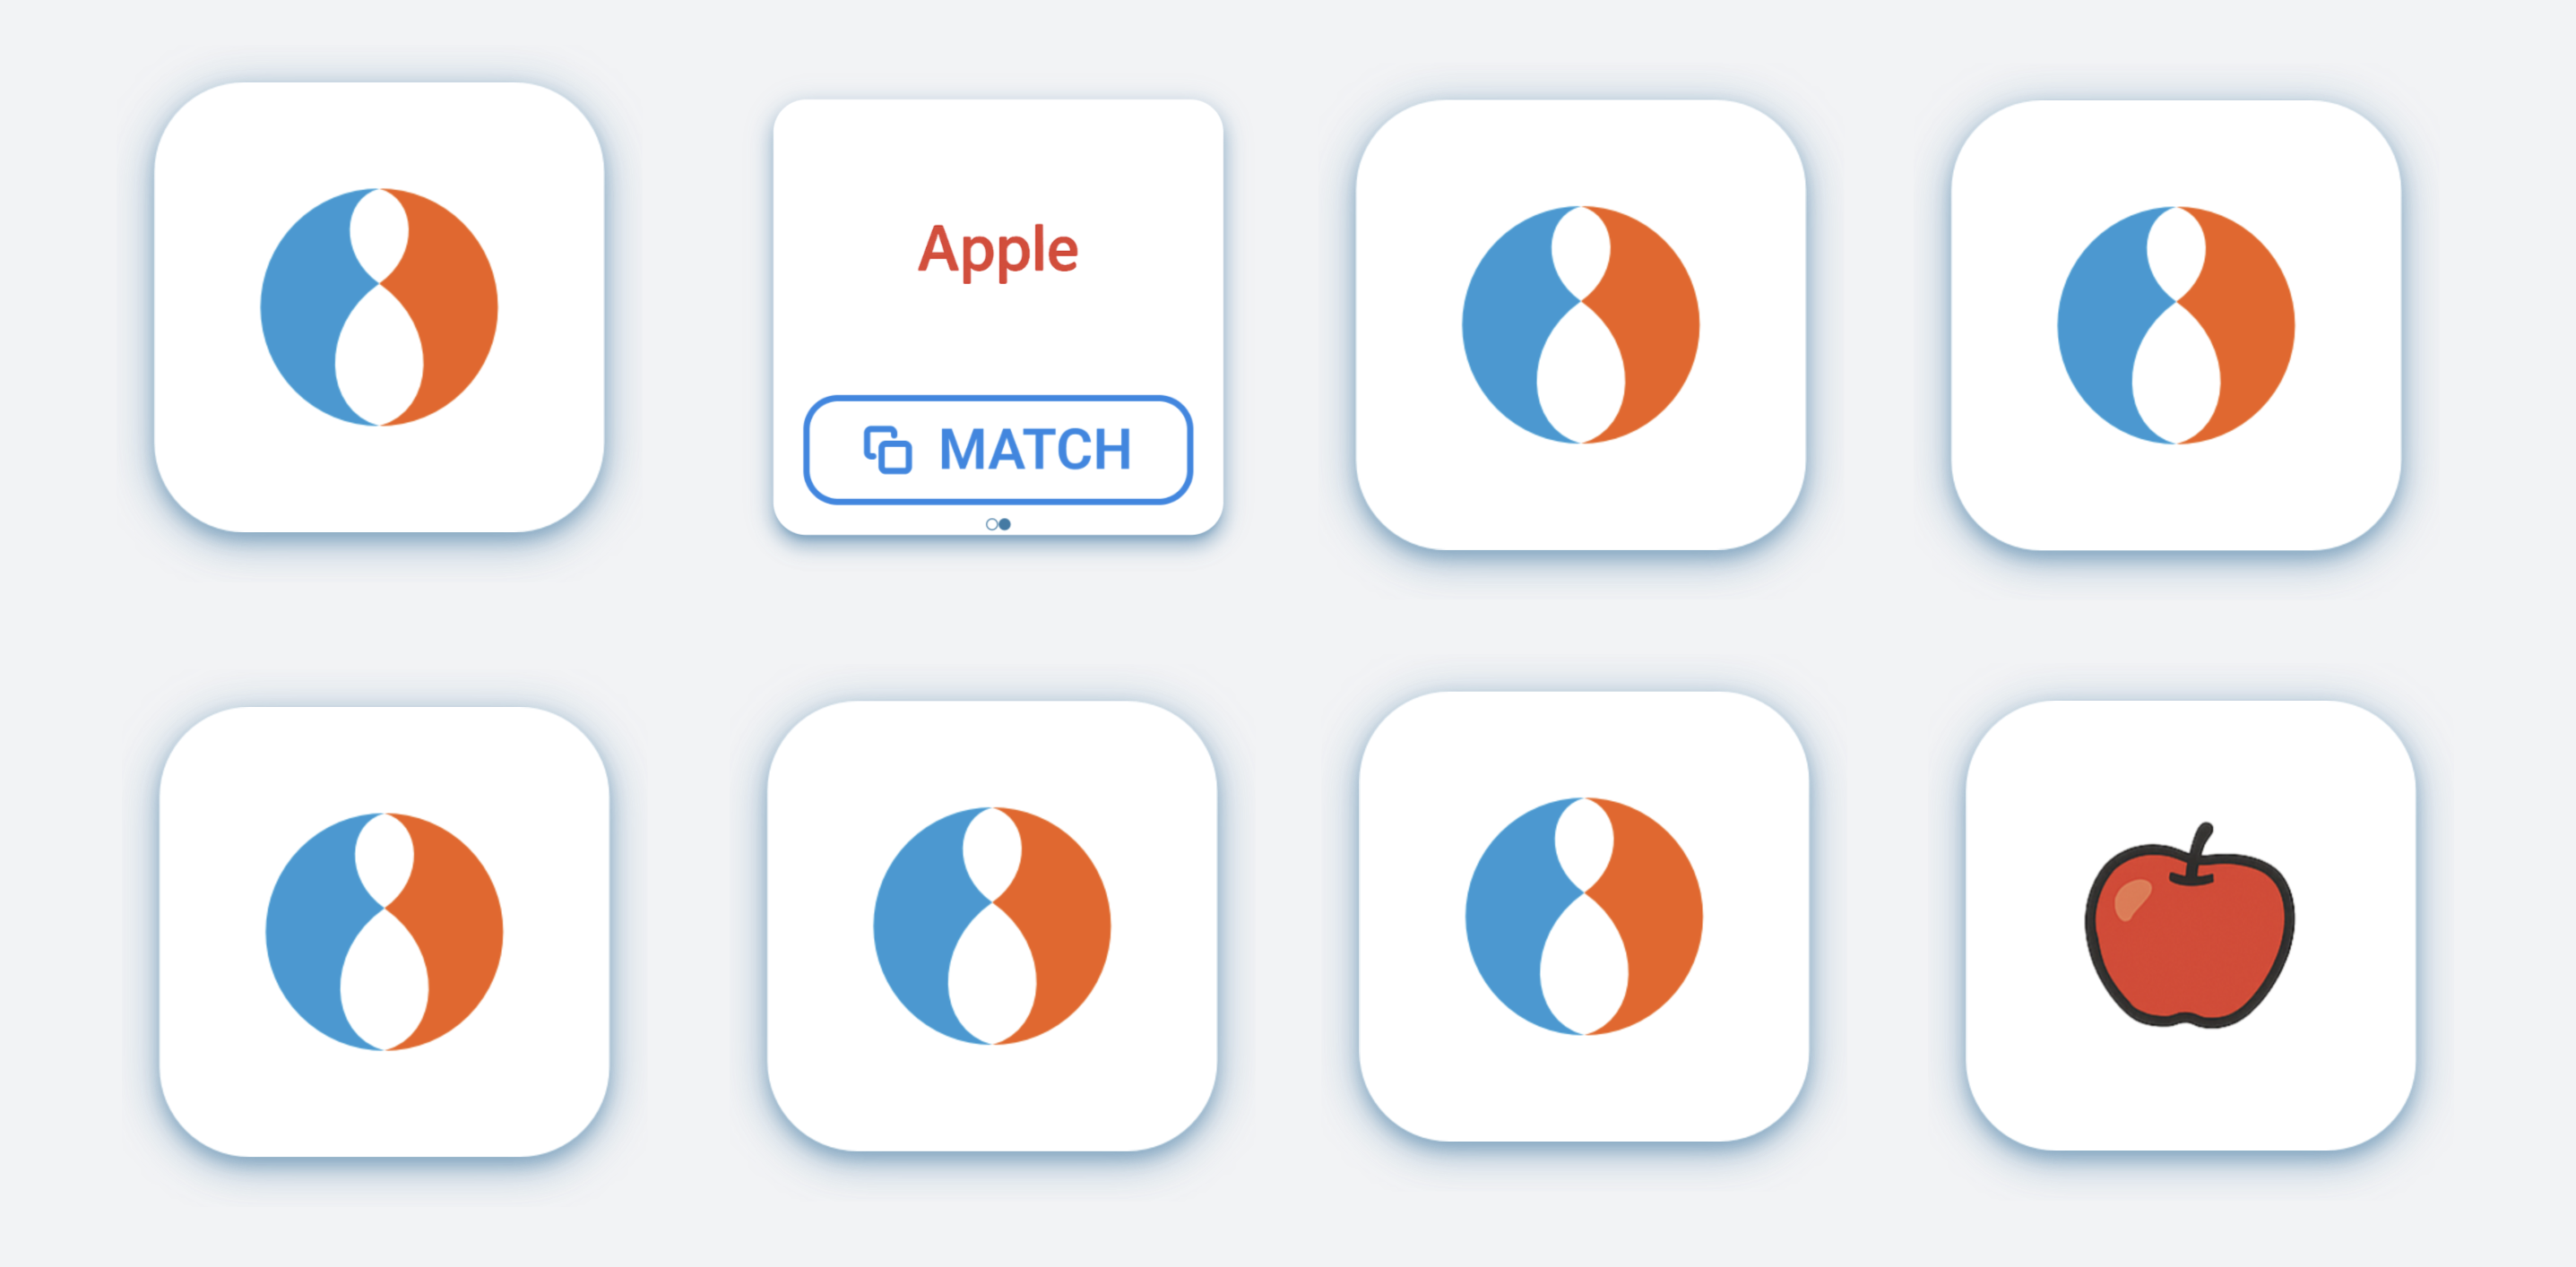
There’s no logic checking if the match is correct: if you open a plum and click “Match” on “apple,” both apple cards disappear.
Locations and presentations have a lot in common: both let you set the camera, open or hide cells. But they work differently and serve distinct purposes.
Locations are standalone—not tied to any order. You can use them as links, embeds, or the starting document view. They’re great for navigation hubs, interactive quizzes, or sharing a specific section of a document.
Presentations follow a fixed order and are meant for linear walkthroughs—ideal for guiding a reader or audience step by step. When you open a presentation, the top panel is hidden and you can only read the document.
When working on a document, you don’t have to choose only presentations or only locations. You can combine them: make a presentation for a class and add an interactive quiz with locations. During a presentation, you can freely open cells or trigger locations by a link—then continue the presentation to the next step.
Right now, there are three modes used when creating presentations. In the first mode, you can open and close cells in the step you're editing. In the second mode, you set the camera by selecting the exact cells it should focus on—either by clicking or selecting them in bulk. In the last mode, you control which cells are visible. You do this by clicking or selecting cells in bulk to choose which ones should be shown, while the rest will be hidden.
We’ve made presentations easier to create over the years. We added shortcuts, such as TAB for a new step and SHIFT+TAB to copy the current camera. In open/close mode, much happens automatically: opening a cell sets the camera and reveals it, closing a cell removes the camera. Most presentations can be built in this main mode, and the other two modes are needed only sporadically.
Modes are one of the first ideas people come up with when designing an app. Programmers often like them. It’s an easy way to group features and give each mode different behavior. But that’s not how people’s brains work.
We often end up in the wrong mode. Especially if the modes don’t look very distinct. We expect one thing to happen but something else does. Only then do we realize we’re in the wrong mode and have to switch.
This happened to us all the time when working on presentations. We wanted to set the camera on two cells. So we switched the mode and did it. Then we kept working and forgot we were still in camera mode. Suddenly, things didn’t work as expected. Even selecting cells behaves differently when in camera and visibility modes, which is frustrating.
In OrgPad, we try to make things feel natural. You should be able to focus on your work, not on the tool. That’s why we decided to replace modes with a simpler system.
We tested this approach while building locations. A location works like one step in a presentation. But you don’t need to switch modes when editing them. We added a clear blue border to show the camera settings. You set the camera and visibility using selection and shortcuts. This lets us test and improve the new controls in real situations. We don’t have to change the presentation workflow until everything is ready.
We plan to bring this system to presentations soon. We believe it will make presentations much easier to create. We already caught ourselves wishing we could use it there too. Of course, we’ll test it properly while working on real presentations. And as a bonus, it will make OrgPad’s code simpler.
Note: keyboard shortcuts for locations differ from those in presentations. Instead of F2–F4 and Q, W, E, you use F2, F3, Q, and W—with shifted meanings. We’ll unify these shortcuts when presentations get the upgrade.
Adding locations to OrgPad has been on our roadmap for a while. We’re happy to finally have them ready. Developing this touched many parts of OrgPad, as you’ve seen in this article. At their heart, locations make it easier to share cells and control what appears when you open an OrgPage. But they also offer advanced options, like building interactive documents through a network of locations.
We’re planning an update that will automatically create previews for all locations. You'll see these previews when you embed a location within another OrgPage, or share a link to it on social media. We aren't doing this yet, as it could put too much strain on the server that creates OrgPage previews with Chrome. The plan is to improve the server and add preview generation for all locations.
We sometimes get asked if a single cell can be shared across multiple OrgPages, so that any changes are reflected everywhere. We’re considering making this work through an embedded implicit location pointing to a specific cell. The cell would behave normally, but be marked as shared between OrgPages. You could list all OrgPages it appears in, and jump between them. For now, this is just an idea, but we think it’s worth exploring.
Clicking a location link adds its ID to the address and creates a browser history entry. You can then move back and forth between locations. Right now, this isn’t perfect—for example, going back doesn’t restore hidden cells. We’re planning a fix.
The main challenge is knowing when a location was activated by a back action and when by clicking a link again. We’ll need to update how OrgPad handles history which may fix other issues. Today we use the older History API, but we want to explore the new Navigation API.